> ## Documentation Index
> Fetch the complete documentation index at: https://docs.allgoodhq.com/llms.txt
> Use this file to discover all available pages before exploring further.
# Hosted Mailbox + Custom Domains
> Configure DNS records to enable direct email delivery to allGood.
By setting up a dedicated subdomain (such as `replies.yourcompany.com`), your marketing emails are delivered directly to allGood and processed by Mary—no forwarding rules required. This is the recommended setup for all new customers.
Emails are delivered directly to allGood without configuring forwarding in your email client or server.
Handles high email volumes without relay limitations.
Industry-standard email authentication protects against spoofing and phishing.
**Prerequisites**—you'll need the following before getting started:
* **DNS management access** for your domain.
* **Authority to create subdomains** (or approval from your domain administrator).
* **Basic DNS knowledge** (understanding of record types: MX, TXT, CNAME).
* A **subdomain name decided** (e.g., `replies.yourcompany.com` or `marketing-replies.yourcompany.com`).
**Estimated setup time:** 15–30 minutes for DNS configuration, plus 24–48 hours for DNS propagation.
**No deliverability impact.** Because this subdomain only *receives* email—it never sends—there is no domain warming required and no risk to your existing sending reputation.
Go to **Settings → Email Domains** and click **+ Add Domain**.
Enter the reply subdomain that will receive your marketing replies (for example, `reply.yourcompany.com`) and click **Set up domain**. Always use a dedicated subdomain, never your root domain.
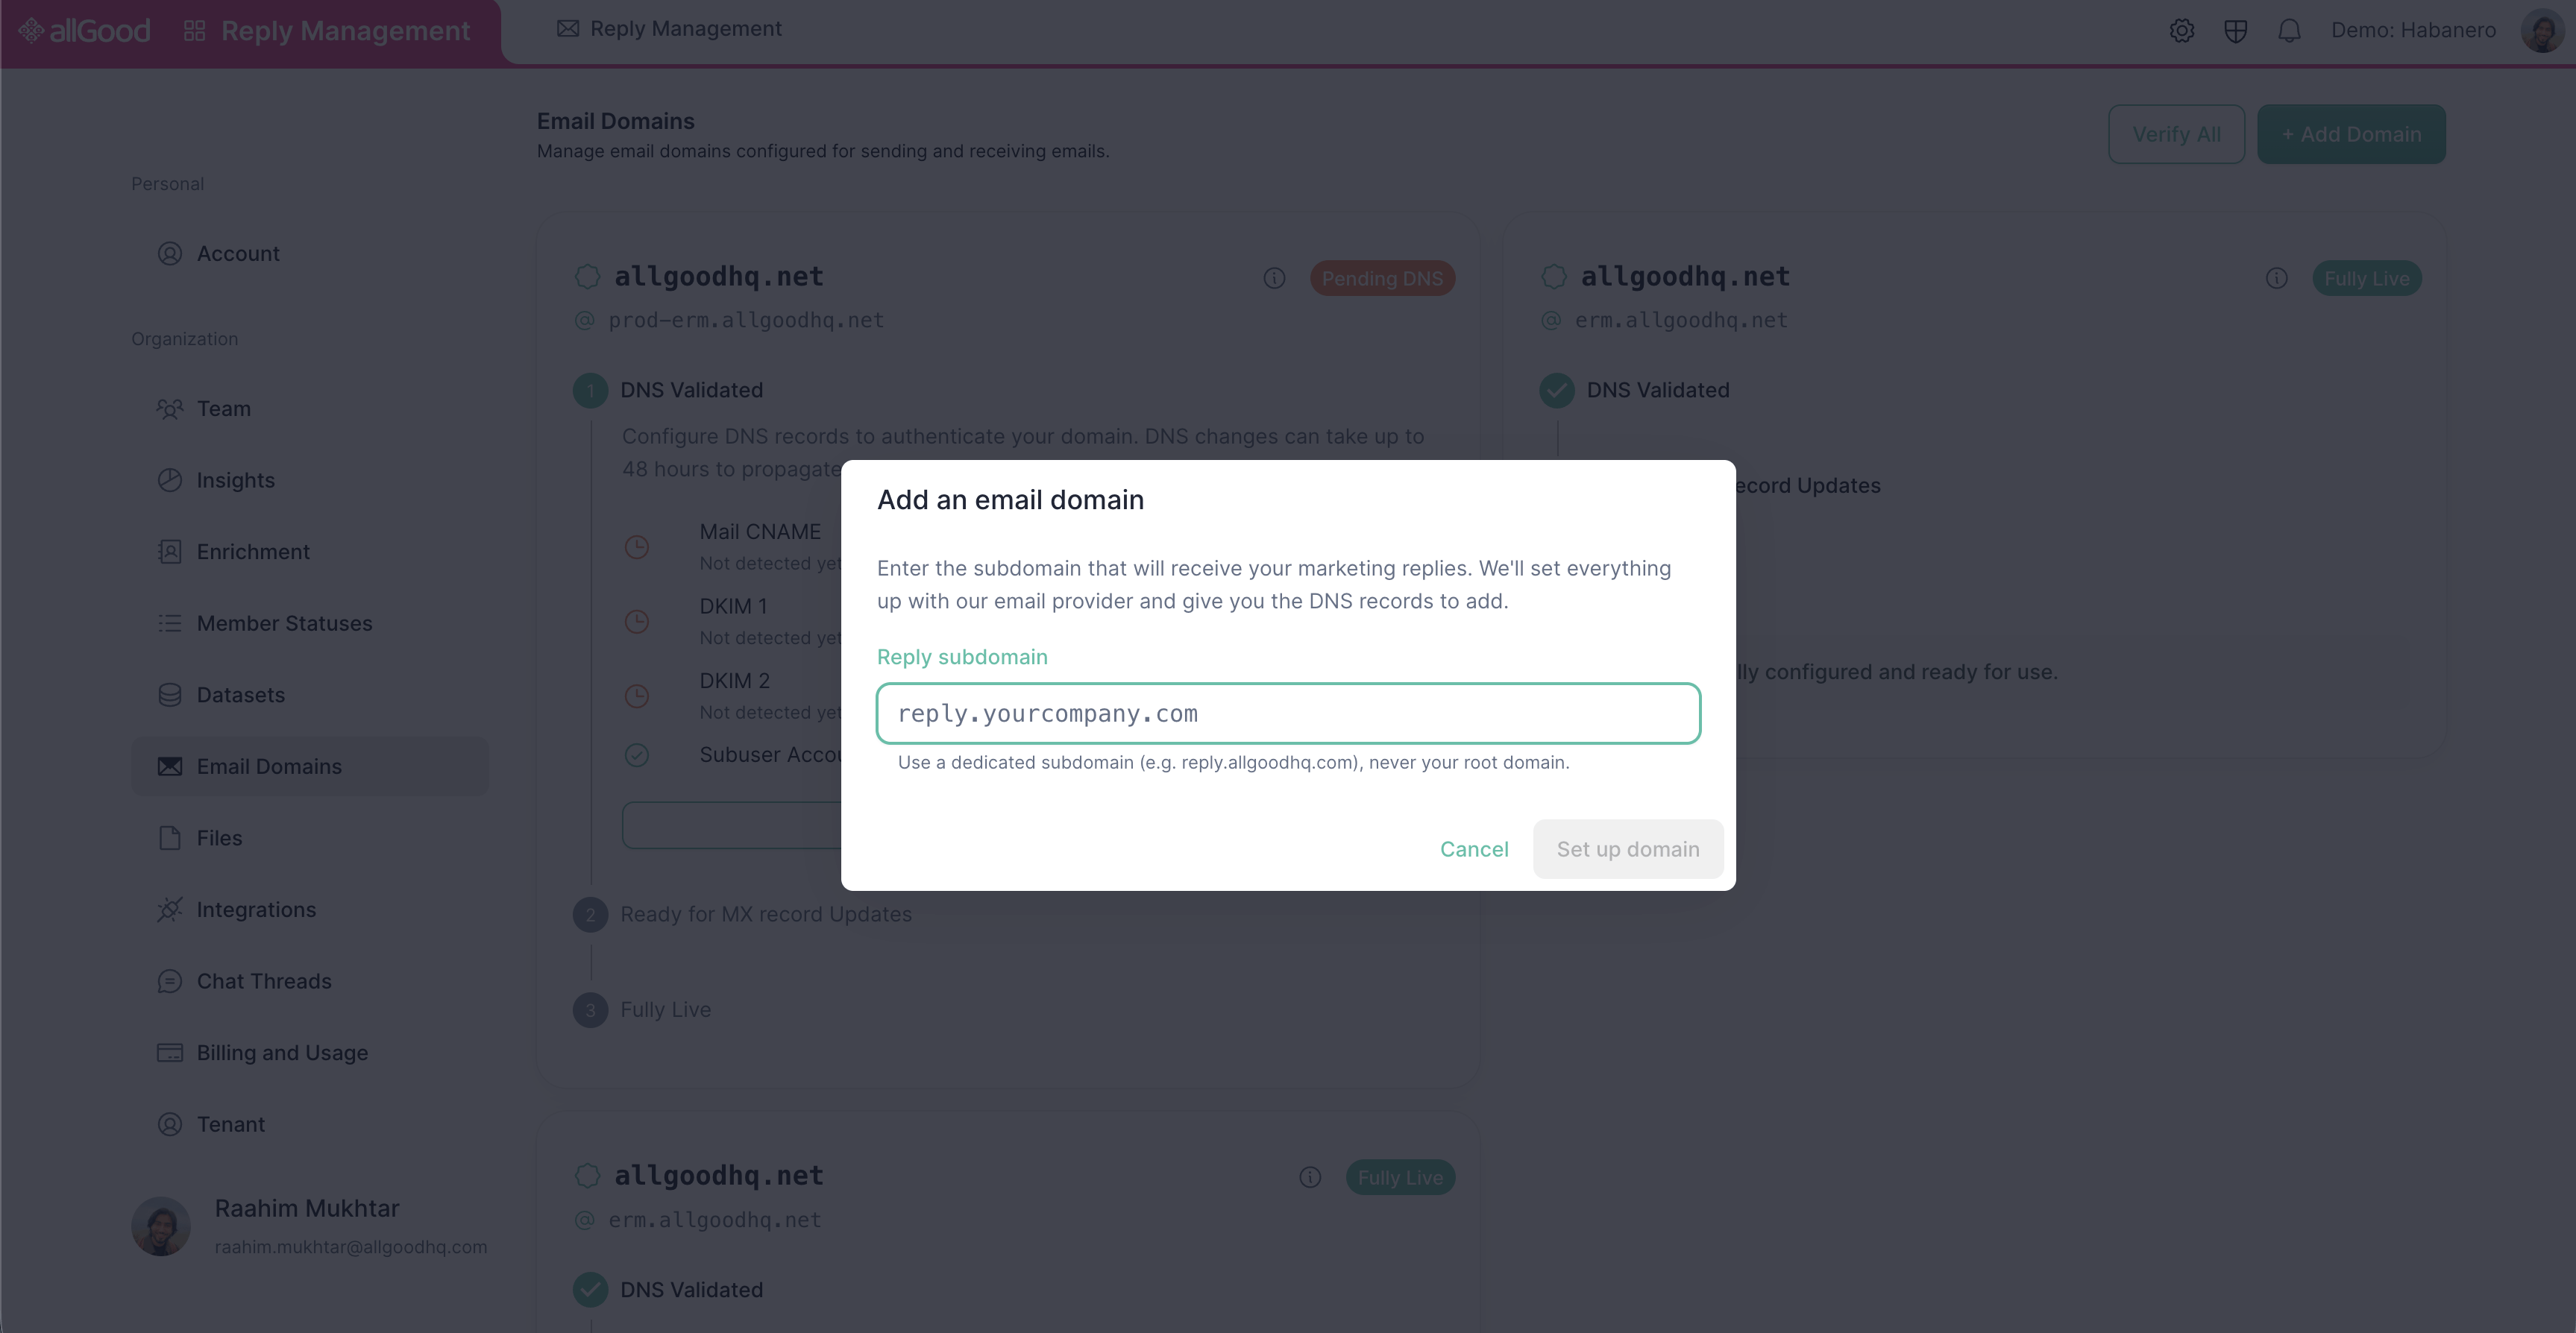 When you submit, allGood sets up the domain automatically and returns the **DNS records** (the mail CNAME and two DKIM CNAMEs) for you to add at your DNS provider.
The new domain immediately appears in your **Email Domains** list with a **Pending DNS** status and a checklist showing what still needs to be completed (**DNS Validated → Ready for MX Record Updates → Fully Live**).
You will need to configure the following DNS records in your domain provider. Each serves a specific security and delivery purpose.
Add all three CNAME records provided by allGood. The values below are illustrative — use the exact values shown in your allGood **DNS Record Details** panel.
| Type | Host | Value |
| ----- | ------------------------------------ | ------------------------------------------ |
| CNAME | `em****.prod-erm.allgood.net` | `u*******.wl002.sendgrid.net` |
| CNAME | `s1._domainkey.prod-erm.allgood.net` | `s1.domainkey.u*******.wl002.sendgrid.net` |
| CNAME | `s2._domainkey.prod-erm.allgood.net` | `s2.domainkey.u*******.wl002.sendgrid.net` |
Copy the exact host and value strings directly from the allGood platform to avoid typos.
After updating your DNS records, click **Verify All** to validate every pending domain. allGood then checks the CNAME records you added.
Validation typically completes within **10–15 minutes**, though in some cases it may take up to **24–48 hours**.
Once the DNS records pass, allGood **automatically provisions inbound processing** for the domain — no manual configuration required. Behind the scenes we ensure your inbound connection exists and create the SendGrid Inbound Parse setting that forwards incoming mail to allGood. The domain then moves to **Ready for MX Record Updates**.
When you submit, allGood sets up the domain automatically and returns the **DNS records** (the mail CNAME and two DKIM CNAMEs) for you to add at your DNS provider.
The new domain immediately appears in your **Email Domains** list with a **Pending DNS** status and a checklist showing what still needs to be completed (**DNS Validated → Ready for MX Record Updates → Fully Live**).
You will need to configure the following DNS records in your domain provider. Each serves a specific security and delivery purpose.
Add all three CNAME records provided by allGood. The values below are illustrative — use the exact values shown in your allGood **DNS Record Details** panel.
| Type | Host | Value |
| ----- | ------------------------------------ | ------------------------------------------ |
| CNAME | `em****.prod-erm.allgood.net` | `u*******.wl002.sendgrid.net` |
| CNAME | `s1._domainkey.prod-erm.allgood.net` | `s1.domainkey.u*******.wl002.sendgrid.net` |
| CNAME | `s2._domainkey.prod-erm.allgood.net` | `s2.domainkey.u*******.wl002.sendgrid.net` |
Copy the exact host and value strings directly from the allGood platform to avoid typos.
After updating your DNS records, click **Verify All** to validate every pending domain. allGood then checks the CNAME records you added.
Validation typically completes within **10–15 minutes**, though in some cases it may take up to **24–48 hours**.
Once the DNS records pass, allGood **automatically provisions inbound processing** for the domain — no manual configuration required. Behind the scenes we ensure your inbound connection exists and create the SendGrid Inbound Parse setting that forwards incoming mail to allGood. The domain then moves to **Ready for MX Record Updates**.
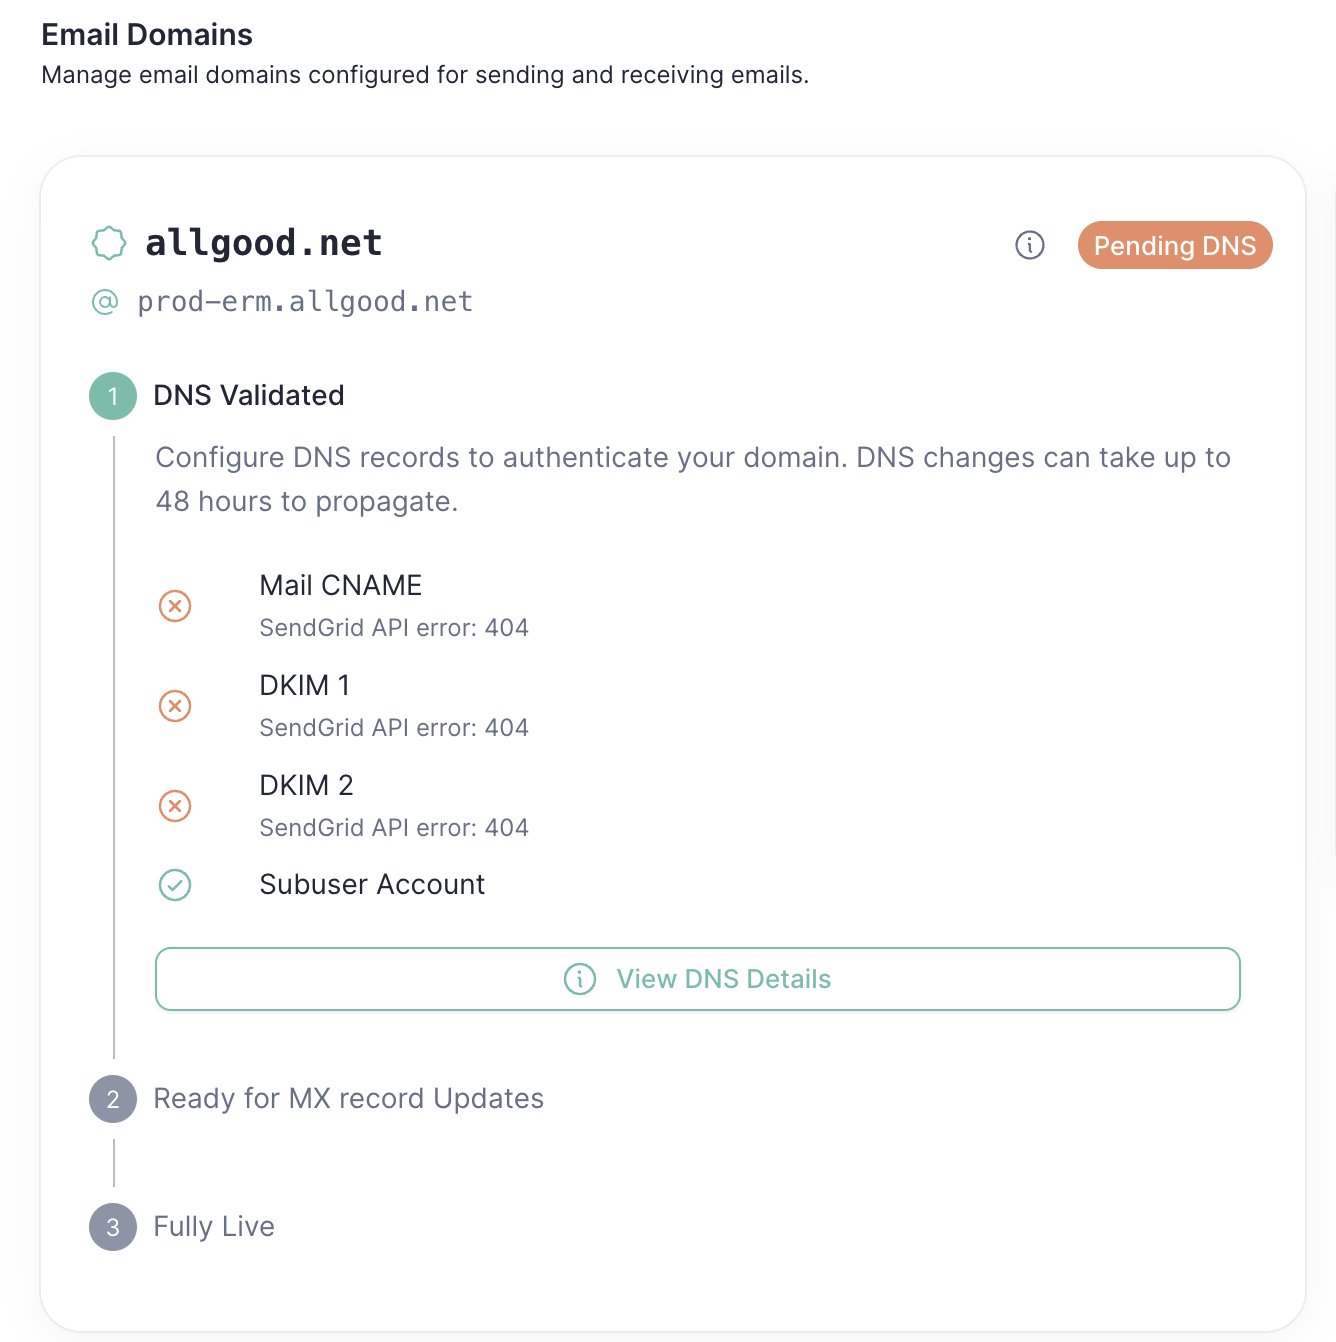 Do **not** add your MX record until the domain reaches **Ready for MX Record Updates** and the MX value is shown. Adding it earlier can disrupt mail delivery for the domain.
The MX (Mail Exchange) record is the most critical record — it must be configured correctly for any emails to be delivered.
Once the domain reaches **Ready for MX Record Updates**, the MX record appears in the domain's details. Add it at your DNS provider using the exact host shown there — the example below is illustrative and your host will be different.
| Type | Host | Priority | Value |
| ---- | ------------------ | -------- | ----------------- |
| MX | `` | `10` | `mx.sendgrid.net` |
allGood runs a final validation that resolves your domain's MX record to confirm it points to `mx.sendgrid.net`. Once it does, the domain flips to **Fully Live** and is ready to receive replies.
**Important notes:**
* The priority value should be **lower than** any existing MX records if you're adding this to a domain that already receives email.
* Some DNS providers require a trailing period (`.`) at the end of the mail server address — check your provider's format.
* If configuring a subdomain, ensure you use the subdomain name, not your root domain.
Once DNS verification succeeds, confirm everything is working end-to-end:
1. **Send a test email** to your new subdomain (e.g., `test@replies.yourcompany.com`)
2. **Check allGood Email Reply Management** — the email should appear within 2–5 minutes
3. **Verify classification** — ensure the email is correctly classified by the AI
**Test email checklist:**
Email received in allGood
Email correctly classified
Automated actions triggered (if configured)
CRM updates processed (if applicable)
## Troubleshooting
Check the following common causes:
* **DNS not propagated yet** — Wait 24–48 hours after making DNS changes.
* **Wrong subdomain** — Verify emails are being sent to the exact subdomain you configured.
* **MX priority conflict** — If other MX records exist, ensure your allGood record has the lowest priority number.
* **Firewall blocking** — Check if your outbound email server can reach SendGrid's servers.
Debugging steps:
Use DNS lookup tools (`dig`, `nslookup`, or an online DNS checker) to verify your records have propagated correctly.
Contact allGood support with the following information:
* Test email timestamp
* Sender and recipient email addresses
* Screenshot of DNS verification status in allGood
Do **not** add your MX record until the domain reaches **Ready for MX Record Updates** and the MX value is shown. Adding it earlier can disrupt mail delivery for the domain.
The MX (Mail Exchange) record is the most critical record — it must be configured correctly for any emails to be delivered.
Once the domain reaches **Ready for MX Record Updates**, the MX record appears in the domain's details. Add it at your DNS provider using the exact host shown there — the example below is illustrative and your host will be different.
| Type | Host | Priority | Value |
| ---- | ------------------ | -------- | ----------------- |
| MX | `` | `10` | `mx.sendgrid.net` |
allGood runs a final validation that resolves your domain's MX record to confirm it points to `mx.sendgrid.net`. Once it does, the domain flips to **Fully Live** and is ready to receive replies.
**Important notes:**
* The priority value should be **lower than** any existing MX records if you're adding this to a domain that already receives email.
* Some DNS providers require a trailing period (`.`) at the end of the mail server address — check your provider's format.
* If configuring a subdomain, ensure you use the subdomain name, not your root domain.
Once DNS verification succeeds, confirm everything is working end-to-end:
1. **Send a test email** to your new subdomain (e.g., `test@replies.yourcompany.com`)
2. **Check allGood Email Reply Management** — the email should appear within 2–5 minutes
3. **Verify classification** — ensure the email is correctly classified by the AI
**Test email checklist:**
Email received in allGood
Email correctly classified
Automated actions triggered (if configured)
CRM updates processed (if applicable)
## Troubleshooting
Check the following common causes:
* **DNS not propagated yet** — Wait 24–48 hours after making DNS changes.
* **Wrong subdomain** — Verify emails are being sent to the exact subdomain you configured.
* **MX priority conflict** — If other MX records exist, ensure your allGood record has the lowest priority number.
* **Firewall blocking** — Check if your outbound email server can reach SendGrid's servers.
Debugging steps:
Use DNS lookup tools (`dig`, `nslookup`, or an online DNS checker) to verify your records have propagated correctly.
Contact allGood support with the following information:
* Test email timestamp
* Sender and recipient email addresses
* Screenshot of DNS verification status in allGood