> ## Documentation Index
> Fetch the complete documentation index at: https://docs.allgoodhq.com/llms.txt
> Use this file to discover all available pages before exploring further.
# Workfront
The Workfront integration connects allGood with Adobe Workfront's work management platform. This integration enables seamless project management, resource allocation, and team collaboration by synchronizing projects, tasks, and workflows between both systems.
Enhance your enterprise work management capabilities by combining Workfront's powerful project management features with allGood's automation and integration capabilities.
## Prerequisites
Before setting up the Workfront integration with Mary, ensure you have:
* **Adobe Workfront account** with admin permissions to create OAuth applications
* **IT department coordination** for creating OAuth2 applications
* **allGood (Mary) account** with any Access Level with at least these permissions:
* View Projects
* View Tasks
* View Documents
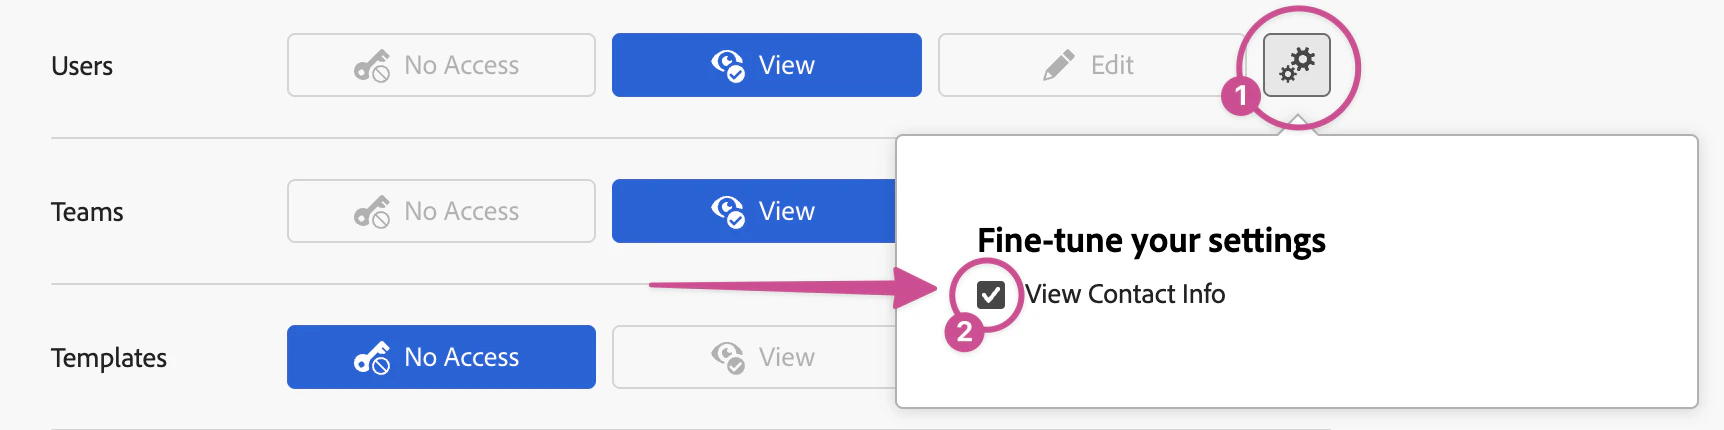
* View Users (make sure that the fine-tune setting of **"View Contact Info"** is turned on)
* **Inbox access** to the allGood (Mary) account to receive verification codes
### Configuring Access Levels
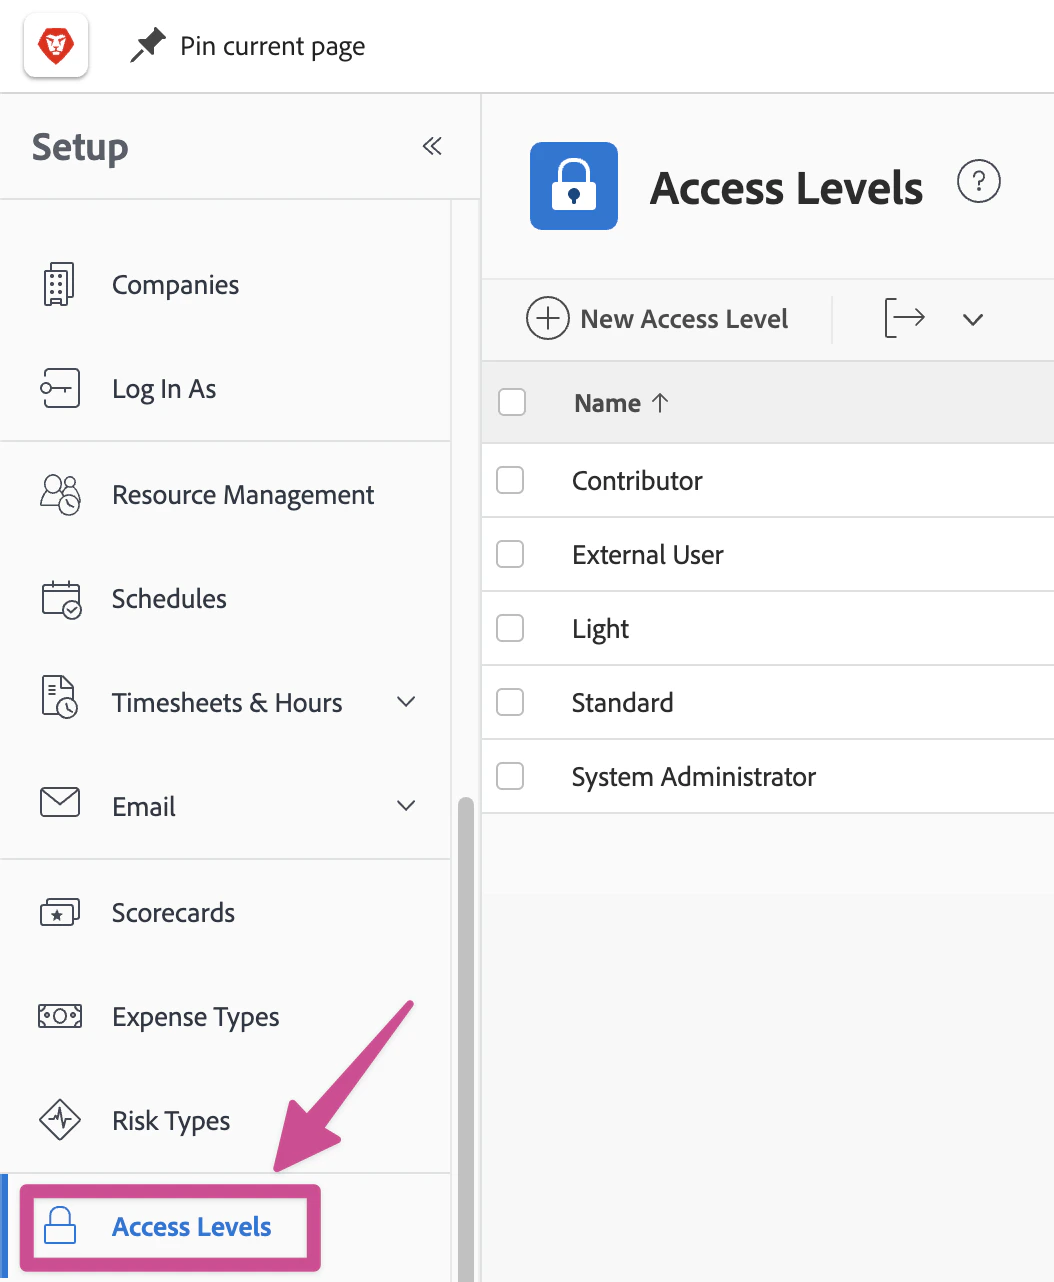
Navigate to **Setup** > **Access Levels** in Workfront.
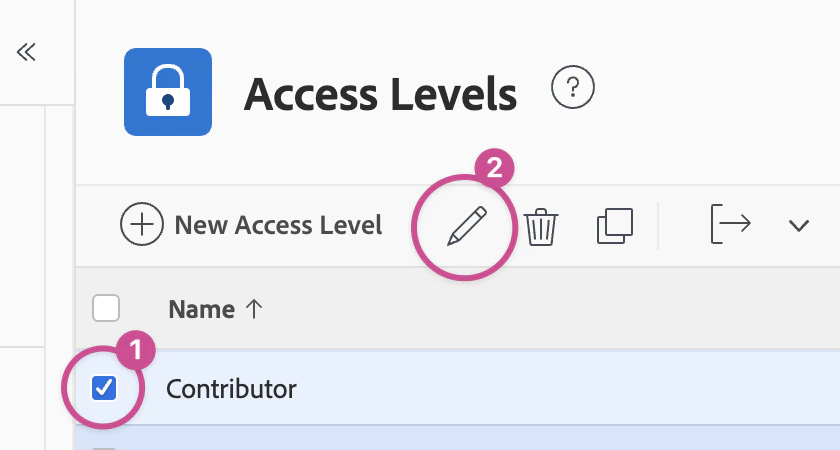
 Select the access level (e.g., **Contributor**) and click the edit icon to configure permissions.
 Under **Users**, make sure that the fine-tune setting **"View Contact Info"** is enabled.
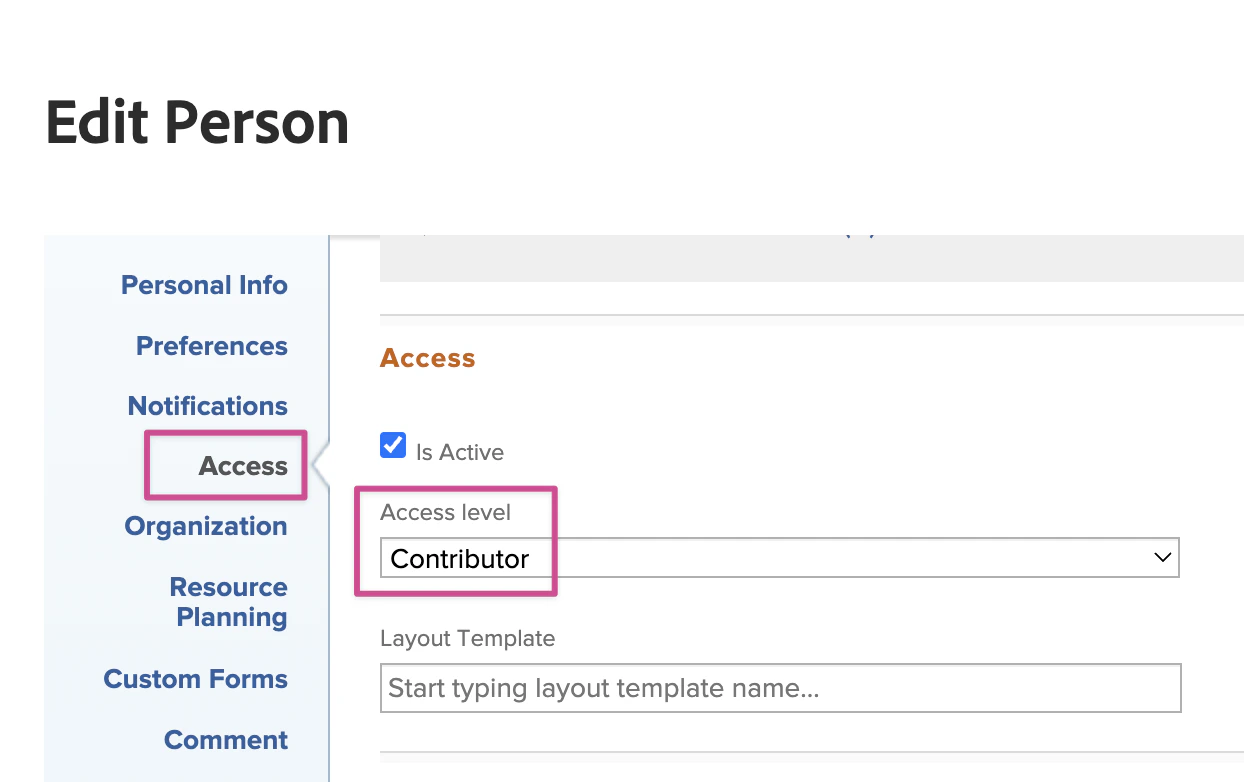
 Assign the allGood (Mary) account to this access level.
 ## IT Coordination Guide
### Security & Account Setup Requirements
* Create a dedicated OAuth2 single-page web application in your Workfront instance
* Configure application with appropriate permissions for allGood integration
* Collect required credentials: Client ID, Client Secret, and Organization Domain
* Store credentials securely according to company policy
* Have inbox access to the allGood (Mary) account to receive verification codes
## Step-by-Step Setup
**IT teams should follow the Adobe Workfront documentation** to create the OAuth2 application:
[Create OAuth2 Applications — Adobe Workfront](https://experienceleague.adobe.com/en/docs/workfront/using/administration-and-setup/configure-integrations/create-oauth-application)
**Summary of steps:**
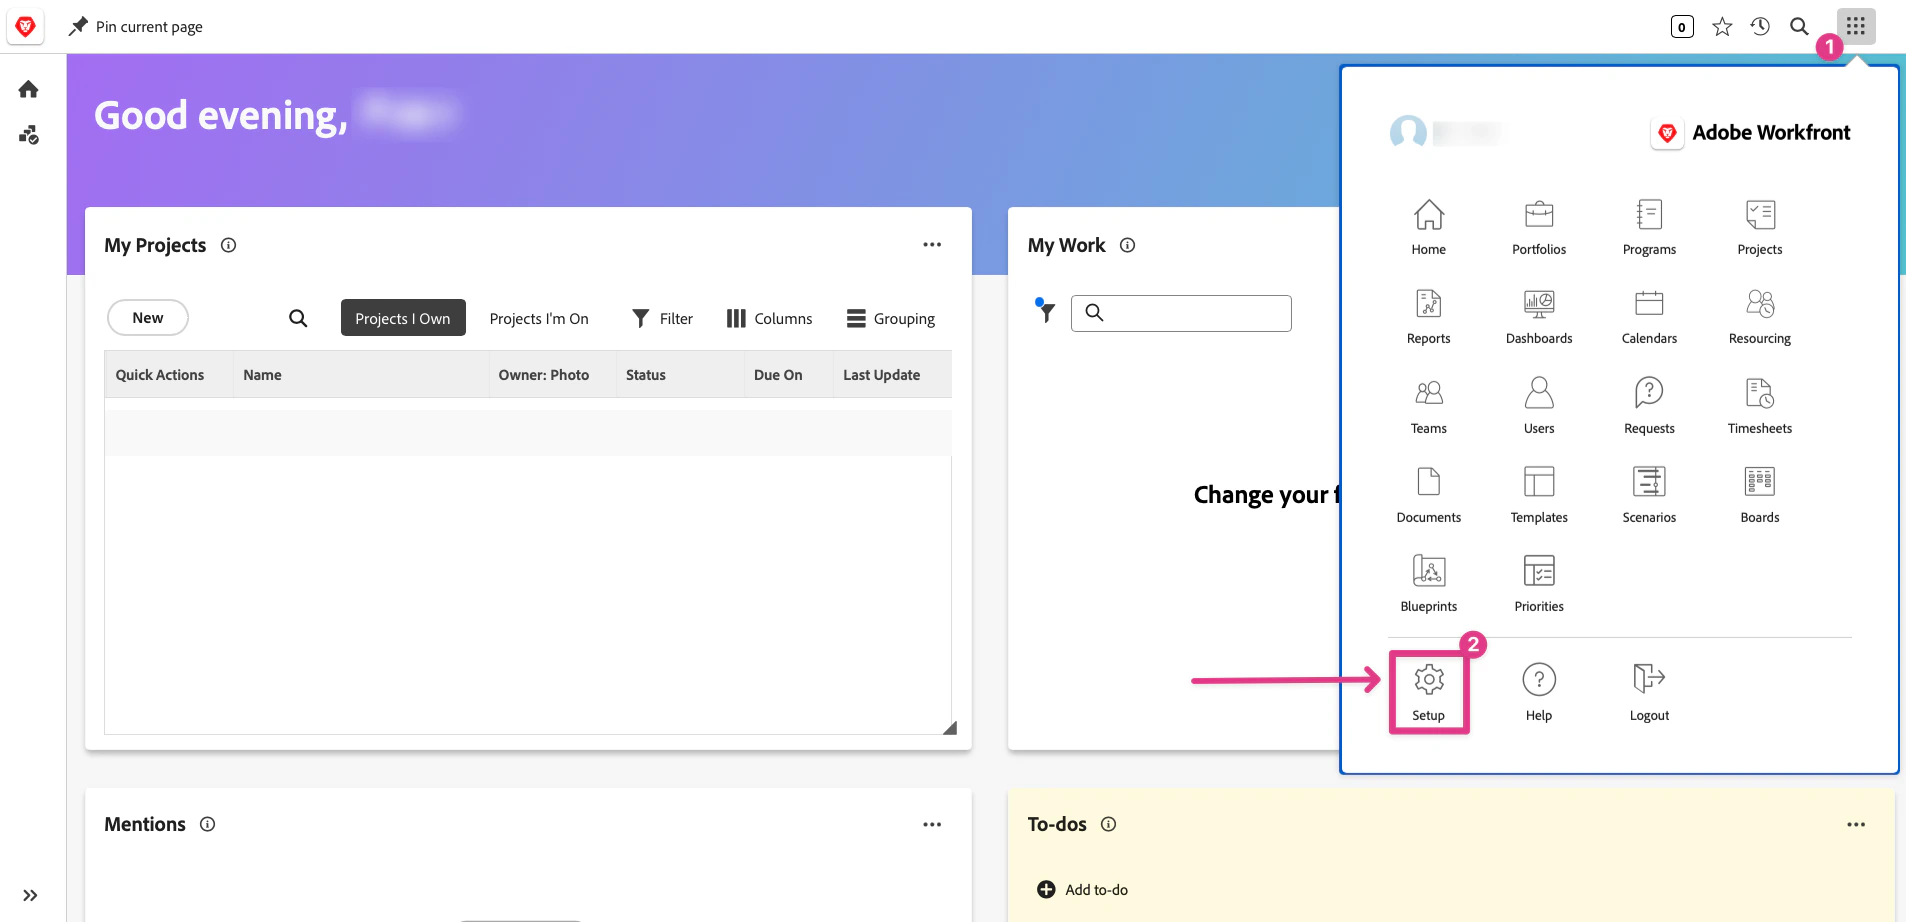
1. Navigate to **Setup** > **System** > **OAuth2 Applications**
## IT Coordination Guide
### Security & Account Setup Requirements
* Create a dedicated OAuth2 single-page web application in your Workfront instance
* Configure application with appropriate permissions for allGood integration
* Collect required credentials: Client ID, Client Secret, and Organization Domain
* Store credentials securely according to company policy
* Have inbox access to the allGood (Mary) account to receive verification codes
## Step-by-Step Setup
**IT teams should follow the Adobe Workfront documentation** to create the OAuth2 application:
[Create OAuth2 Applications — Adobe Workfront](https://experienceleague.adobe.com/en/docs/workfront/using/administration-and-setup/configure-integrations/create-oauth-application)
**Summary of steps:**
1. Navigate to **Setup** > **System** > **OAuth2 Applications**
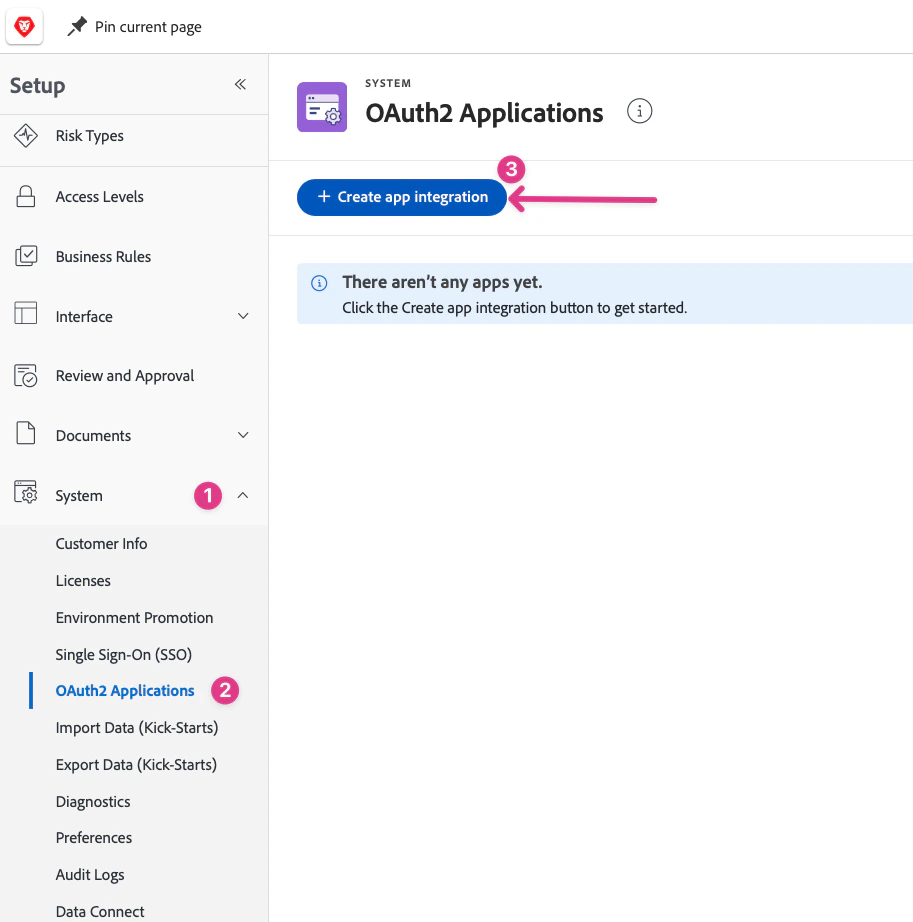 2. Click **Create app integration**
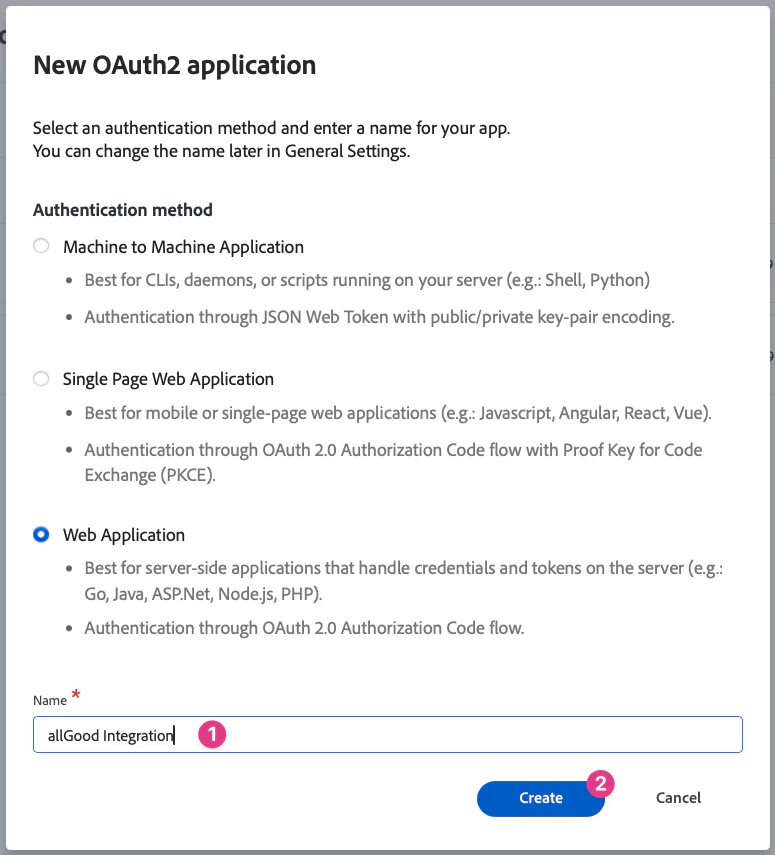
3. Select **Web Application**
4. Enter application name (e.g., "allGood Integration") and click **Create**
2. Click **Create app integration**
3. Select **Web Application**
4. Enter application name (e.g., "allGood Integration") and click **Create**
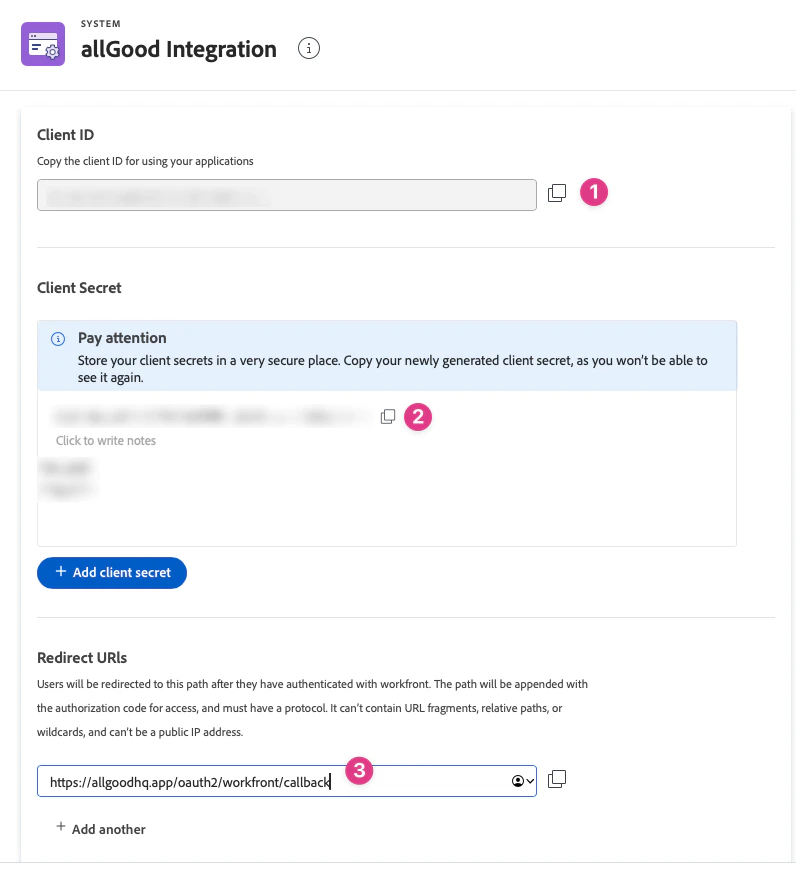
 5. Copy the **Client ID** and **Client Secret** — make sure to keep these in a safe location until the integration is complete
6. Enter the **Redirect URI**: `https://allgoodhq.app/oauth2/workfront/callback`
5. Copy the **Client ID** and **Client Secret** — make sure to keep these in a safe location until the integration is complete
6. Enter the **Redirect URI**: `https://allgoodhq.app/oauth2/workfront/callback`
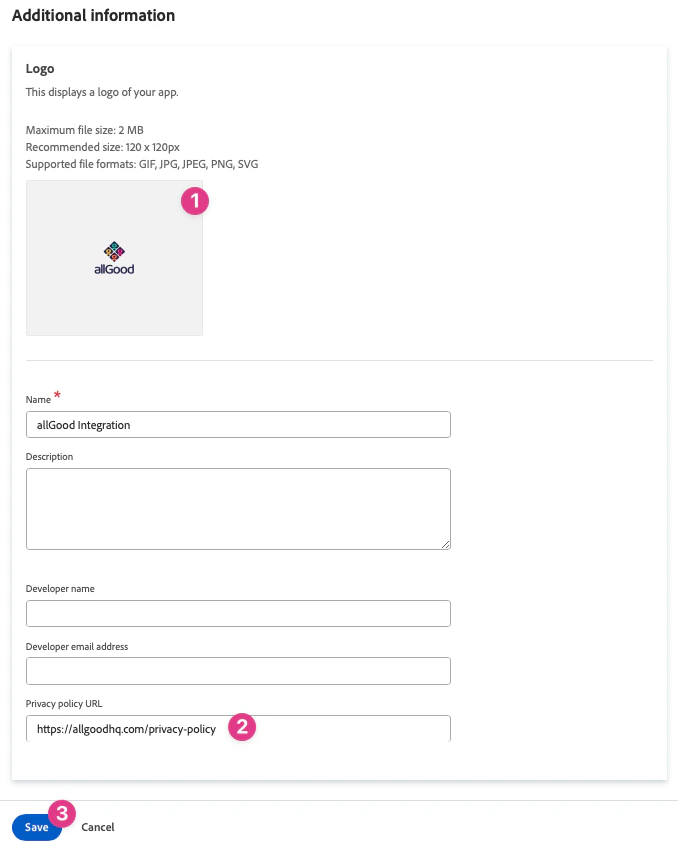
 7. Add the [allGood logo](https://drive.usercontent.google.com/u/0/uc?id=1G0mve--VKuPgLLEY8bRt04vh09MG71RU\&export=download) to the application
8. Add link to privacy policy: `https://www.allgoodhq.com/privacy-policy`
9. Click **Save**
7. Add the [allGood logo](https://drive.usercontent.google.com/u/0/uc?id=1G0mve--VKuPgLLEY8bRt04vh09MG71RU\&export=download) to the application
8. Add link to privacy policy: `https://www.allgoodhq.com/privacy-policy`
9. Click **Save**
 **Important**: Save the following credentials from the created application:
* **Client ID**
* **Client Secret**
* **Organization Domain** (e.g., your-company.my.workfront.com)
1. **Log into allGood** and navigate to **Settings** > **Integrations**
2. Click **Add Integration** and select **Workfront**
3. **Enter the credentials** from Step 1:
* Client ID
* Client Secret
* Organization Domain
**Important**: Save the following credentials from the created application:
* **Client ID**
* **Client Secret**
* **Organization Domain** (e.g., your-company.my.workfront.com)
1. **Log into allGood** and navigate to **Settings** > **Integrations**
2. Click **Add Integration** and select **Workfront**
3. **Enter the credentials** from Step 1:
* Client ID
* Client Secret
* Organization Domain
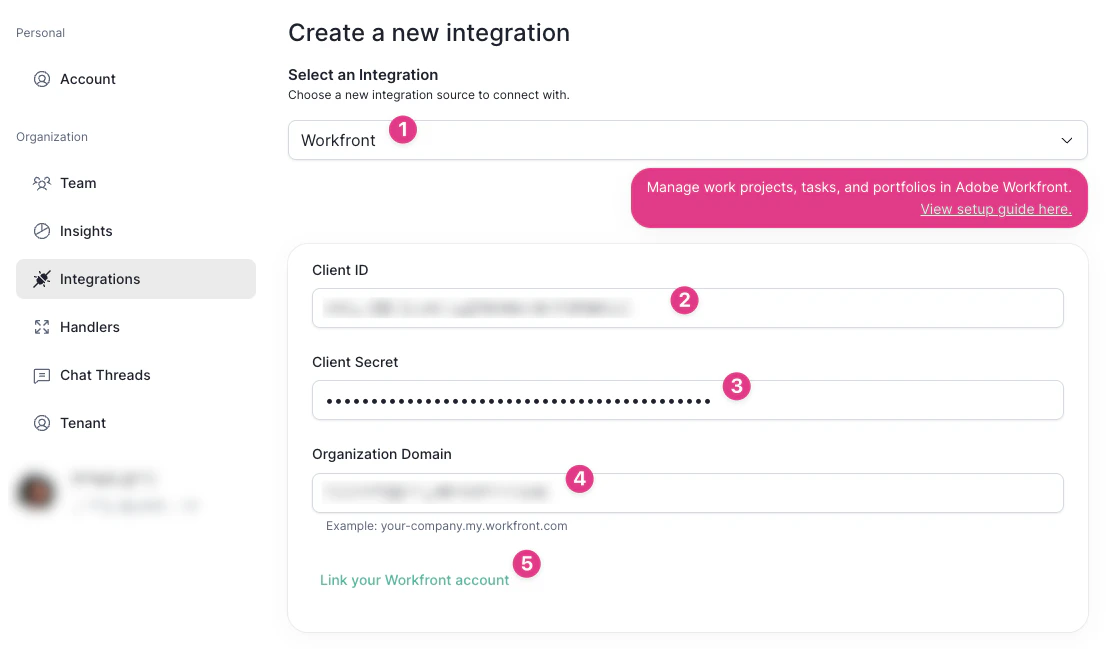 1. After saving credentials, click **Link your Workfront Account**
2. Make sure to keep your Client ID and Client Secret — you'll need them again later
3. Sign in using your **Workfront Admin credentials**
allGood needs access to event subscriptions and only System Admins can create such subscriptions. Once the subscriptions are created, the connection can be re-established with the Mary account (Step 5).
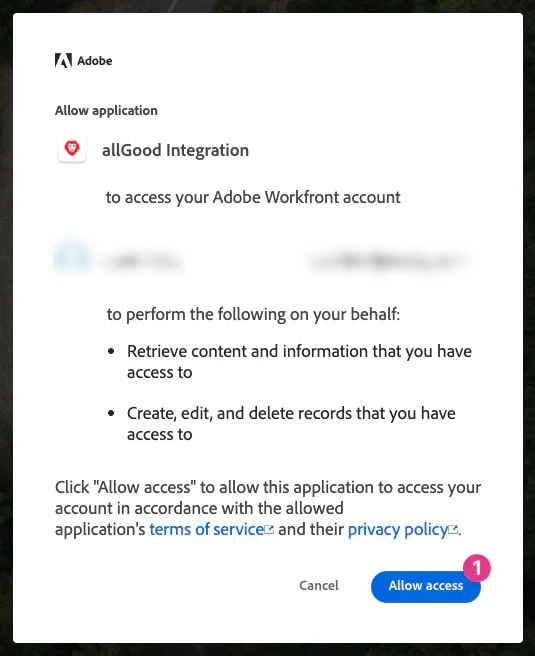
4. **Authorize** allGood to access your Workfront instance
1. After saving credentials, click **Link your Workfront Account**
2. Make sure to keep your Client ID and Client Secret — you'll need them again later
3. Sign in using your **Workfront Admin credentials**
allGood needs access to event subscriptions and only System Admins can create such subscriptions. Once the subscriptions are created, the connection can be re-established with the Mary account (Step 5).
4. **Authorize** allGood to access your Workfront instance
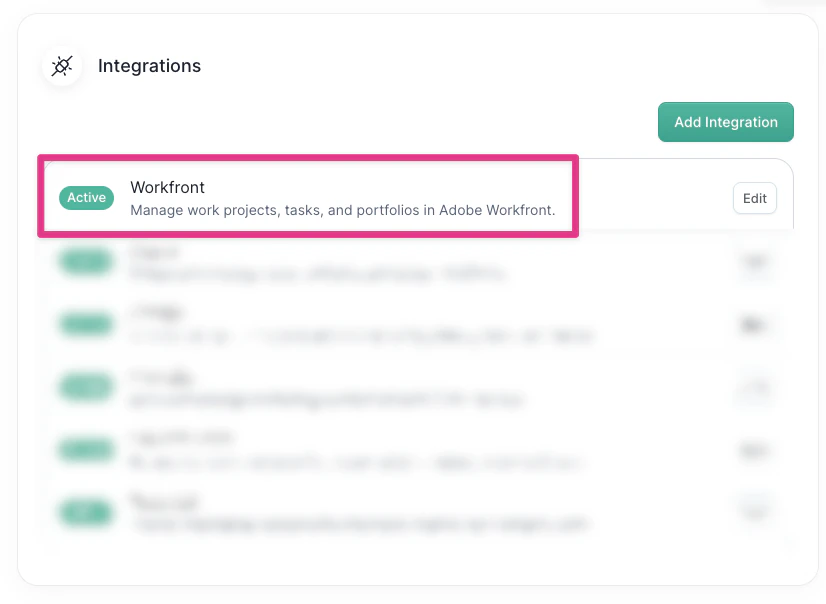
 5. Verify the integration shows as **Active** on your integrations page in allGood
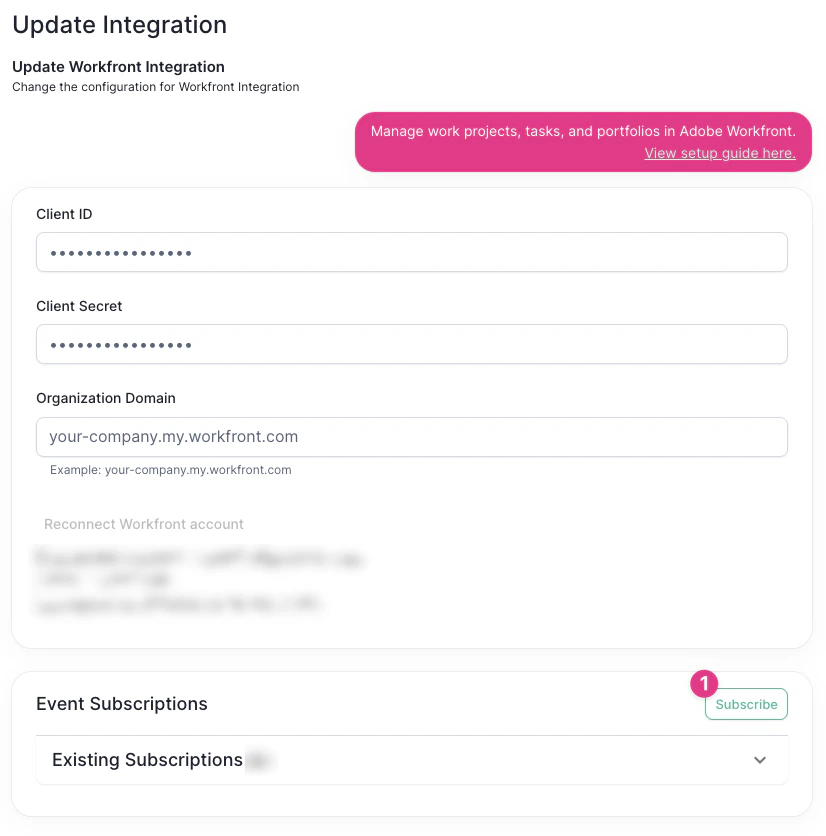
 1. Click **Edit** on the Workfront Integration
2. Click **Subscribe** in the Event Subscriptions section — this will automatically configure the subscriptions necessary for allGood to access your Workfront instance
1. Click **Edit** on the Workfront Integration
2. Click **Subscribe** in the Event Subscriptions section — this will automatically configure the subscriptions necessary for allGood to access your Workfront instance
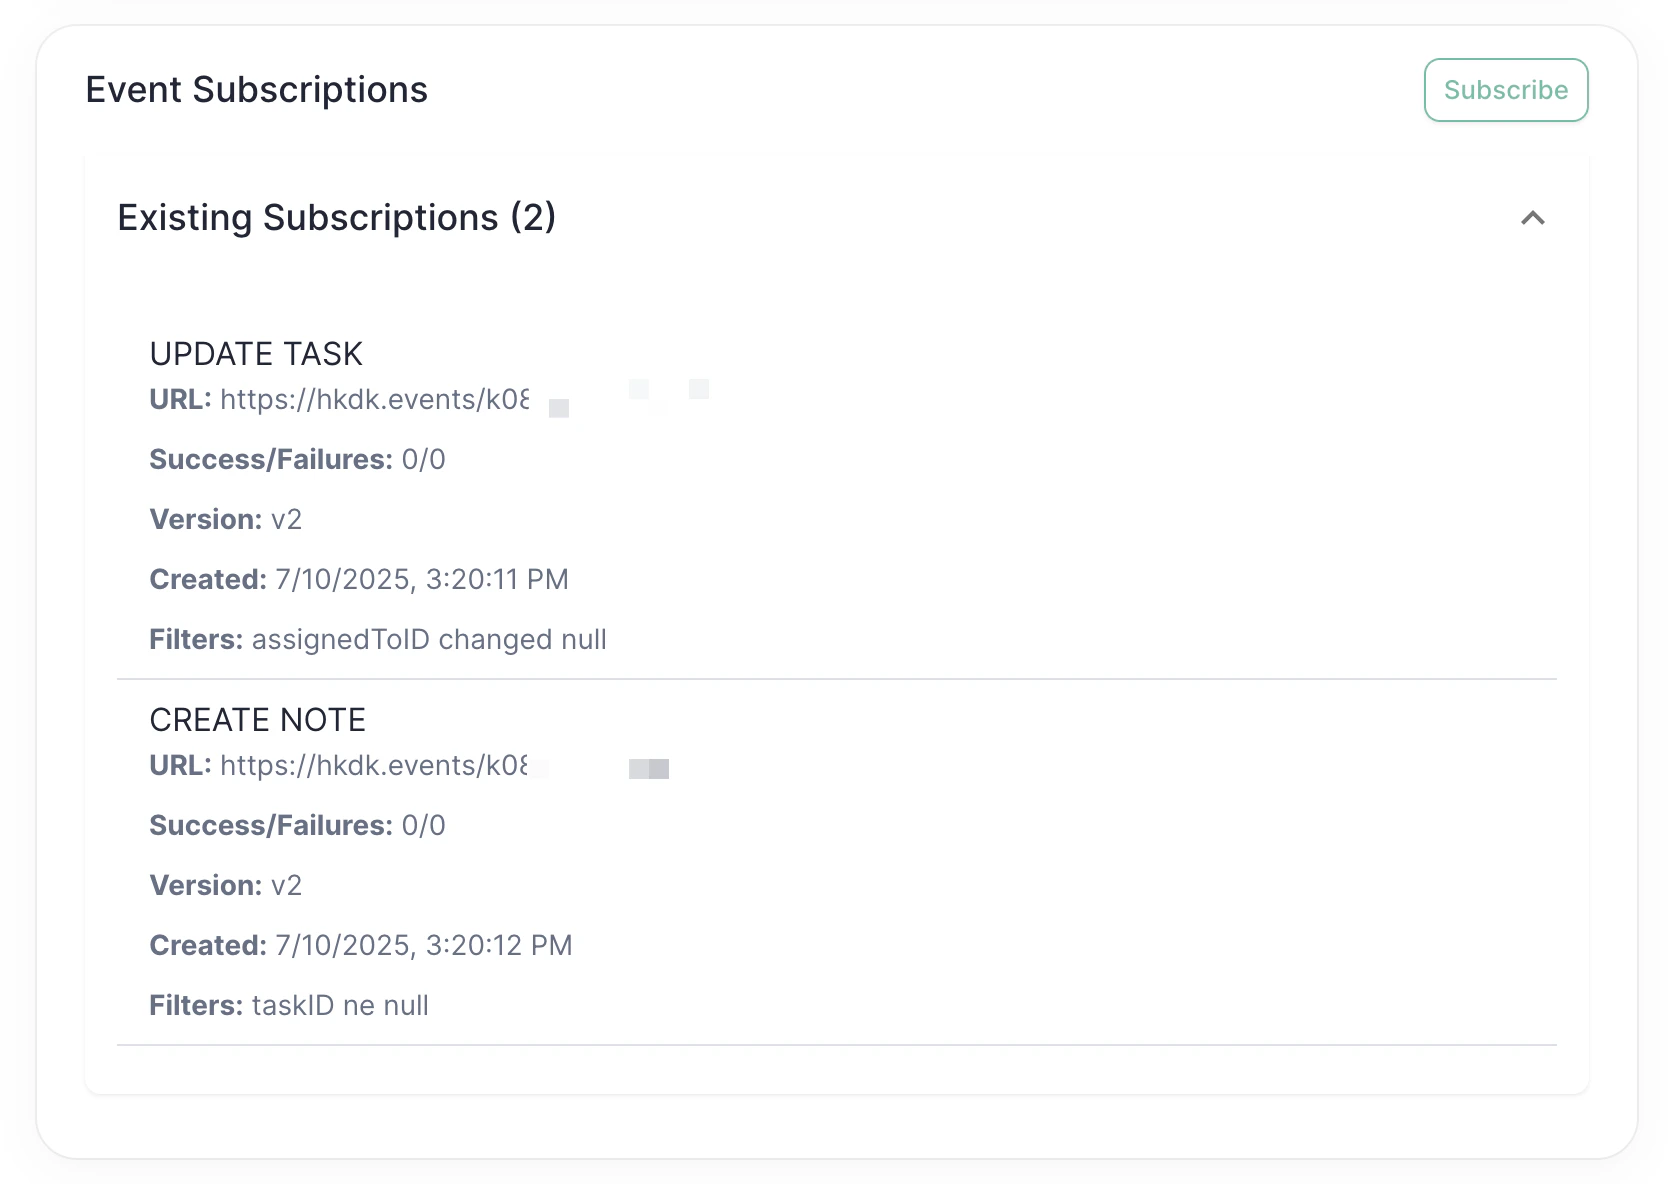
 3. Verify that the two subscriptions were created
 1. Re-enter your **Client ID** and **Client Secret** and click **Link your Workfront Account**
2. Sign in using your **allGood (Mary) account credentials**
* This is what gives Mary access to work on specific tasks assigned to her
You may need to enter a verification code when signing in with the allGood account. Please ensure you're able to access the inbox linked to that email.
## Verification & Testing
If Workfront shows **"Active"** status in allGood integrations, Mary was able to connect successfully.
### Simple Test
To confirm the integration is working properly in Workfront:
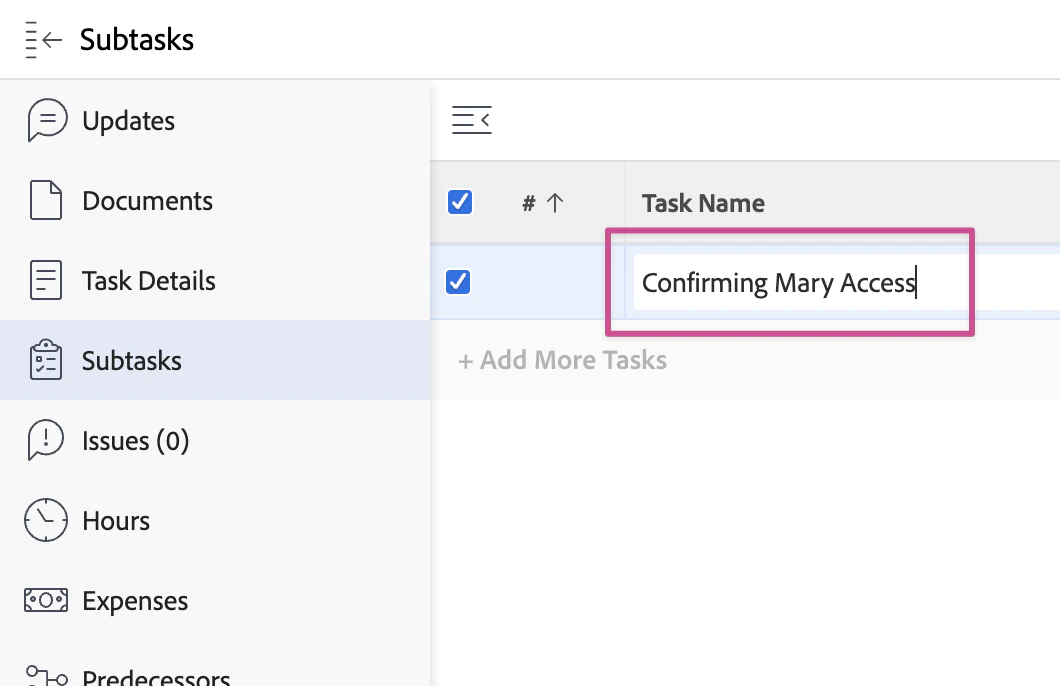
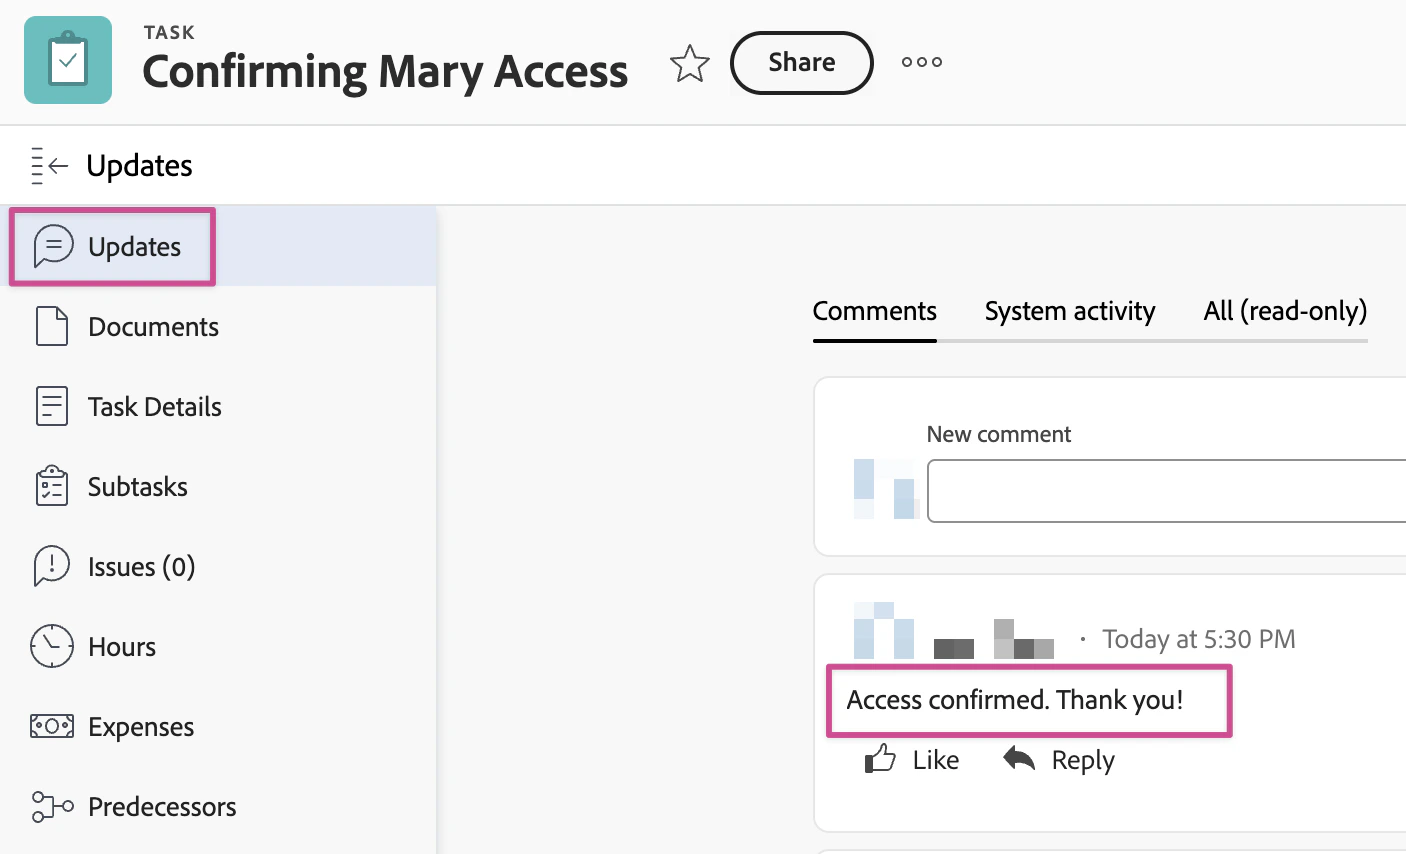
1. Create a task specifically named **"Confirming Mary Access"**
1. Re-enter your **Client ID** and **Client Secret** and click **Link your Workfront Account**
2. Sign in using your **allGood (Mary) account credentials**
* This is what gives Mary access to work on specific tasks assigned to her
You may need to enter a verification code when signing in with the allGood account. Please ensure you're able to access the inbox linked to that email.
## Verification & Testing
If Workfront shows **"Active"** status in allGood integrations, Mary was able to connect successfully.
### Simple Test
To confirm the integration is working properly in Workfront:
1. Create a task specifically named **"Confirming Mary Access"**
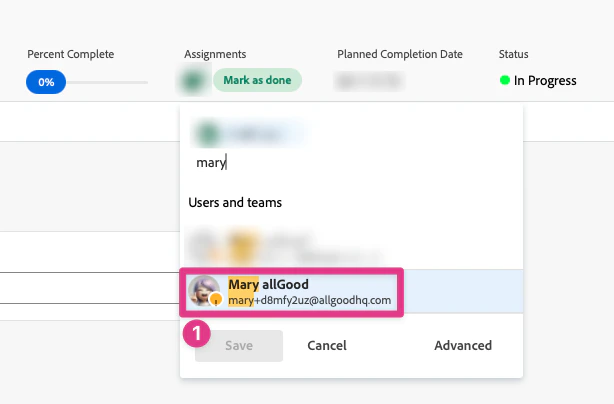
 2. Assign **Mary** to the task
 3. Look for a note left by Mary saying **"Access confirmed. Thank you!"** in the Updates page
 ## Frequently Asked Questions
Yes, you need administrator access to set up the OAuth2 application and
create event subscriptions. Once subscriptions are configured, the
connection is re-established with the Mary account.
The integration uses OAuth 2.0 authentication. You'll need to generate API
credentials via a dedicated OAuth2 application and configure them in allGood
during setup. The Redirect URI must be set to
`https://allgoodhq.app/oauth2/workfront/callback`.
The first connection (Step 3) uses an Admin account to create the required
event subscriptions. The second connection (Step 5) links Mary's account so
she can work on tasks assigned to her.
Yes, you can configure the integration to sync only specific projects,
portfolios, or teams based on your requirements.
The integration supports projects, tasks, users, teams, portfolios, and
custom forms from your Workfront instance.
Resource allocation, time tracking, and capacity planning data sync
bidirectionally to maintain consistency across platforms.
## Troubleshooting
Common causes include:
* Insufficient user permissions
* API access restrictions
* Network connectivity issues
* Object-level sharing restrictions
Check your API credentials, verify user permissions, and ensure your Workfront instance allows API access from the allGood IP addresses.
This is expected. Ensure you have inbox access to the email address linked to the allGood (Mary) account so you can retrieve the verification code.
* Review this page for setup steps and common issues
* Contact our support team for technical assistance
## Frequently Asked Questions
Yes, you need administrator access to set up the OAuth2 application and
create event subscriptions. Once subscriptions are configured, the
connection is re-established with the Mary account.
The integration uses OAuth 2.0 authentication. You'll need to generate API
credentials via a dedicated OAuth2 application and configure them in allGood
during setup. The Redirect URI must be set to
`https://allgoodhq.app/oauth2/workfront/callback`.
The first connection (Step 3) uses an Admin account to create the required
event subscriptions. The second connection (Step 5) links Mary's account so
she can work on tasks assigned to her.
Yes, you can configure the integration to sync only specific projects,
portfolios, or teams based on your requirements.
The integration supports projects, tasks, users, teams, portfolios, and
custom forms from your Workfront instance.
Resource allocation, time tracking, and capacity planning data sync
bidirectionally to maintain consistency across platforms.
## Troubleshooting
Common causes include:
* Insufficient user permissions
* API access restrictions
* Network connectivity issues
* Object-level sharing restrictions
Check your API credentials, verify user permissions, and ensure your Workfront instance allows API access from the allGood IP addresses.
This is expected. Ensure you have inbox access to the email address linked to the allGood (Mary) account so you can retrieve the verification code.
* Review this page for setup steps and common issues
* Contact our support team for technical assistance