> ## Documentation Index
> Fetch the complete documentation index at: https://docs.allgoodhq.com/llms.txt
> Use this file to discover all available pages before exploring further.
# Set up Web Tracking on your site
> Install the Web Tracking tag to record page views and form submissions, gated by visitor consent, on any site you run.
Web Tracking is a single script tag you add to your site. Once it's live, it records page views and carries your forms' submissions back to allGood. This article walks you through getting your tag, installing it, and setting what it tracks.
Web Tracking connects visitor activity on your site to the contacts and campaigns you manage in allGood. Without it, you can still send campaigns and build forms — but you won't see who visited which pages, or how a submission ties back to a specific visitor.
## Prerequisites
* Access to the **Web Tracking** settings for your account
* The ability to edit the `` of the pages you want to track, or access to Google Tag Manager for that site
* Your site's origin (domain) added to your allowed origins list — see [Set up Web Edge Sessions for your site](/mk/settings/web-edge/sessions-setup) if you haven't done this yet
## How the tag decides what to send
The tag has two independent switches, both in the **What the tag does** section of the Web Tracking page.
**Send events to allGood** is the master switch. Turn it off and the tag sends nothing at all — no page views, and no custom `identify()` or `track()` calls from your own code either.
**Automatic page views** controls only the page-view events the tag generates on its own — on page load, and on route changes in single-page apps. Turn it off and the tag stops sending those. Your own `identify()` and `track()` calls still go through, and forms still submit normally.
Toggling either switch shows a status chip — **Publishing…**, then **Live at the edge** — while the change reaches allGood's network. The previous setting still applies until it turns green.
Consent applies only to the first switch. Page views and custom events only send once your visitor's consent — configured under your [Consent Provider](/mk/settings/web-edge/consent-provider) — allows it. Form submissions are the exception. A submission is an explicit action the visitor took. It's covered by a separate form-processing permission instead — never by analytics consent. It also never uses the tracking key.
If events seem stuck and the console is clean, consent is the likely cause. Forcing your consent signal to yes in the browser console, then reloading, confirms it fast.
Your Web Tracking settings only take effect on origins in your allowed origins list. A page that loads the tag from an unlisted origin has its events silently skipped. The browser console shows why, so check there first if events from a specific site go missing.
## Get and install your tag
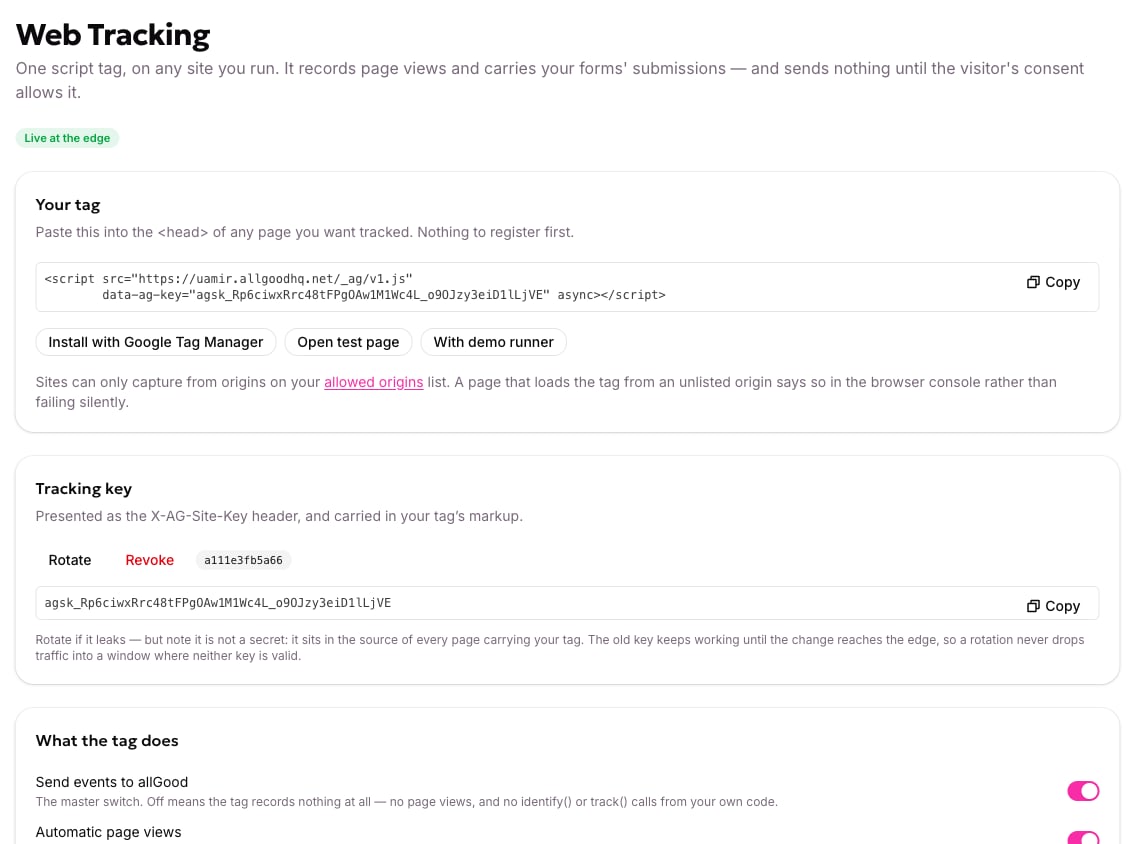 Open **Web Tracking** in your account settings.
In the **Your tag** section, click **Copy** to copy your script tag.
Paste the tag into the `` of every page you want tracked, before the closing `` tag, and keep the `async` attribute. Managing the site through Google Tag Manager instead? Click **Install with Google Tag Manager** and follow the prompts there, rather than editing pages directly. If the tag ends up on a page twice, that's harmless — the second copy detects the first and does nothing.
Confirm the site's origin is on your allowed origins list, under **Web Edge Sessions**. See [Set up Web Edge Sessions for your site](/mk/settings/web-edge/sessions-setup) if you need to add it.
Your tag is now active. It sends events on the next page load after installation, once the origin appears on your allowed list. It still needs **Send events to allGood** turned on, and your visitor's consent, before anything actually sends.
## Confirm it's working
Load one of your tracked pages and open your browser's developer tools.
* **Console** — type `window.allgood.version`. A version string back confirms the script loaded.
* **Network** — filter requests on `_ag`. You should see `/_ag/rc` return `200`, and, once consent allows it, `/_ag/e` return `202`.
You can also click **Open test page** on the Web Tracking settings page. It opens a page allGood hosts on a separate domain, running your real tag against your real settings. It's a full end-to-end check that never touches your own site.
## Manage your tracking key
Your tracking key travels with the tag in your page source and is also sent as the `X-AG-Site-Key` header. It's shown in full, and as a short ID, in the **Tracking key** section of the Web Tracking page.
The key isn't a secret. It sits in the source of every page carrying your tag, so anyone who views that source can see it. Rotate it if you think someone else is using it — not because it was visible.
Click **Rotate** to generate a new key. Your old key keeps working until the new one reaches allGood's edge network. Rotating never creates a window where neither key is valid, so you won't lose traffic during the switch.
Click **Revoke** only when you want a key to stop working immediately. Rotating has a documented grace period; revoking doesn't. Confirm your live tag already uses a different key before you revoke this one — otherwise you risk losing tracking on any page still serving the old one.
## Track custom events
`identify()` and `track()` calls let your own code send custom events beyond automatic page views. Setting these up means adding JavaScript to your site, so it's a task for a developer on your team. Share this article with them, along with the [developer documentation for custom event tracking](/mk/developer/web-edge/identify-and-track), so they have both the account context and the implementation details.
If page views are still not working after installation, see the [Web Edge FAQ](/mk/settings/web-edge/faq).
## Related articles
* [Set up Web Edge Sessions for your site](/mk/settings/web-edge/sessions-setup)
* [How Web Edge keeps your domain secure](/mk/settings/web-edge/how-it-works)
* [Web Edge FAQ](/mk/settings/web-edge/faq)
* [Connect your consent platform](/mk/settings/web-edge/consent-provider)
* Developer documentation: [Custom event tracking with identify() and track()](/mk/developer/web-edge/identify-and-track), [installing the tag](/mk/developer/web-edge/install-the-tag), or [the tag via Google Tag Manager](/mk/developer/web-edge/install-with-gtm)
Open **Web Tracking** in your account settings.
In the **Your tag** section, click **Copy** to copy your script tag.
Paste the tag into the `` of every page you want tracked, before the closing `` tag, and keep the `async` attribute. Managing the site through Google Tag Manager instead? Click **Install with Google Tag Manager** and follow the prompts there, rather than editing pages directly. If the tag ends up on a page twice, that's harmless — the second copy detects the first and does nothing.
Confirm the site's origin is on your allowed origins list, under **Web Edge Sessions**. See [Set up Web Edge Sessions for your site](/mk/settings/web-edge/sessions-setup) if you need to add it.
Your tag is now active. It sends events on the next page load after installation, once the origin appears on your allowed list. It still needs **Send events to allGood** turned on, and your visitor's consent, before anything actually sends.
## Confirm it's working
Load one of your tracked pages and open your browser's developer tools.
* **Console** — type `window.allgood.version`. A version string back confirms the script loaded.
* **Network** — filter requests on `_ag`. You should see `/_ag/rc` return `200`, and, once consent allows it, `/_ag/e` return `202`.
You can also click **Open test page** on the Web Tracking settings page. It opens a page allGood hosts on a separate domain, running your real tag against your real settings. It's a full end-to-end check that never touches your own site.
## Manage your tracking key
Your tracking key travels with the tag in your page source and is also sent as the `X-AG-Site-Key` header. It's shown in full, and as a short ID, in the **Tracking key** section of the Web Tracking page.
The key isn't a secret. It sits in the source of every page carrying your tag, so anyone who views that source can see it. Rotate it if you think someone else is using it — not because it was visible.
Click **Rotate** to generate a new key. Your old key keeps working until the new one reaches allGood's edge network. Rotating never creates a window where neither key is valid, so you won't lose traffic during the switch.
Click **Revoke** only when you want a key to stop working immediately. Rotating has a documented grace period; revoking doesn't. Confirm your live tag already uses a different key before you revoke this one — otherwise you risk losing tracking on any page still serving the old one.
## Track custom events
`identify()` and `track()` calls let your own code send custom events beyond automatic page views. Setting these up means adding JavaScript to your site, so it's a task for a developer on your team. Share this article with them, along with the [developer documentation for custom event tracking](/mk/developer/web-edge/identify-and-track), so they have both the account context and the implementation details.
If page views are still not working after installation, see the [Web Edge FAQ](/mk/settings/web-edge/faq).
## Related articles
* [Set up Web Edge Sessions for your site](/mk/settings/web-edge/sessions-setup)
* [How Web Edge keeps your domain secure](/mk/settings/web-edge/how-it-works)
* [Web Edge FAQ](/mk/settings/web-edge/faq)
* [Connect your consent platform](/mk/settings/web-edge/consent-provider)
* Developer documentation: [Custom event tracking with identify() and track()](/mk/developer/web-edge/identify-and-track), [installing the tag](/mk/developer/web-edge/install-the-tag), or [the tag via Google Tag Manager](/mk/developer/web-edge/install-with-gtm)