

Adding Team Members
The process for adding new users depends on your authentication method.Social Sign-On (Google/Microsoft OAuth)
Sending an inviteTo add someone to your allGood instance, enter their email address and click Invite User. They’ll receive an email invitation to join your organization. Once invited, the user will appear as Pending in the users table until they accept the invitation and complete their first login.
SAML/SSO Organizations
For organizations using SAML/SSO, you cannot directly invite users through allGood. Instead, your IT department needs to provision the user in your identity provider (Okta, Microsoft Entra ID, etc.) and grant them access to the allGood application. Access flow:- IT provisions the user in your SSO system
- IT grants the user access to the allGood application
- User logs in through your company’s SSO portal
- User automatically appears in your allGood team list
User Roles
The platform includes four roles, each building on the previous with additional capabilities:Basic User
Best for: New team members, contractors, or users who need limited access- View existing worksheets and use pre-built templates
- Cannot create new content or access advanced features
Basic Campaign User
Best for: New team members who need limited access to just running campaigns- View existing campaign and use pre-built campaign templates
- Cannot use worksheets, or access advanced features
Standard User
Best for: Regular team members who actively work with data- All Basic User capabilities, plus:
- Create and edit worksheets
- View lab features (skills, teams, tools)
- Set up and manage integrations
Power User
Best for: Advanced users, team leads, or technical specialists- All Standard User capabilities, plus:
- Create and manage custom tools
- Create and edit teams
- Full access to lab management features
Admin
Best for: IT administrators, system owners, or designated administrators- Full access to all platform features
- Manage system settings and user accounts
- Configure Single Sign-On (SSO)
- Access event logs and audit trails
- Invite and remove users
Permissions Matrix
Managing Roles
To change a user’s role:- Navigate to Settings > Team in allGood
- Locate the user
- Click their current role to open the role selector
- Choose the appropriate role and save
- Start conservative — assign the minimum role needed
- Review roles periodically as responsibilities change
- Limit Admin access to essential personnel only
Custom Roles and Access Control
Beyond the standard roles, allGood supports custom roles and granular access control to match your organization’s specific needs.Custom Roles
Custom roles allow you to create tailored permission sets for different subteams within your organization. This is useful when:- Different departments need access to different features
- You want to enforce specific guardrails for certain user groups
- Teams require exposure to only relevant templates and use cases
Custom roles are configured by the allGood team. Contact support@allgoodhq.com to set up custom roles for your organization.
Worksheet Access Control
You can control who has access to view, use, or manage specific worksheets: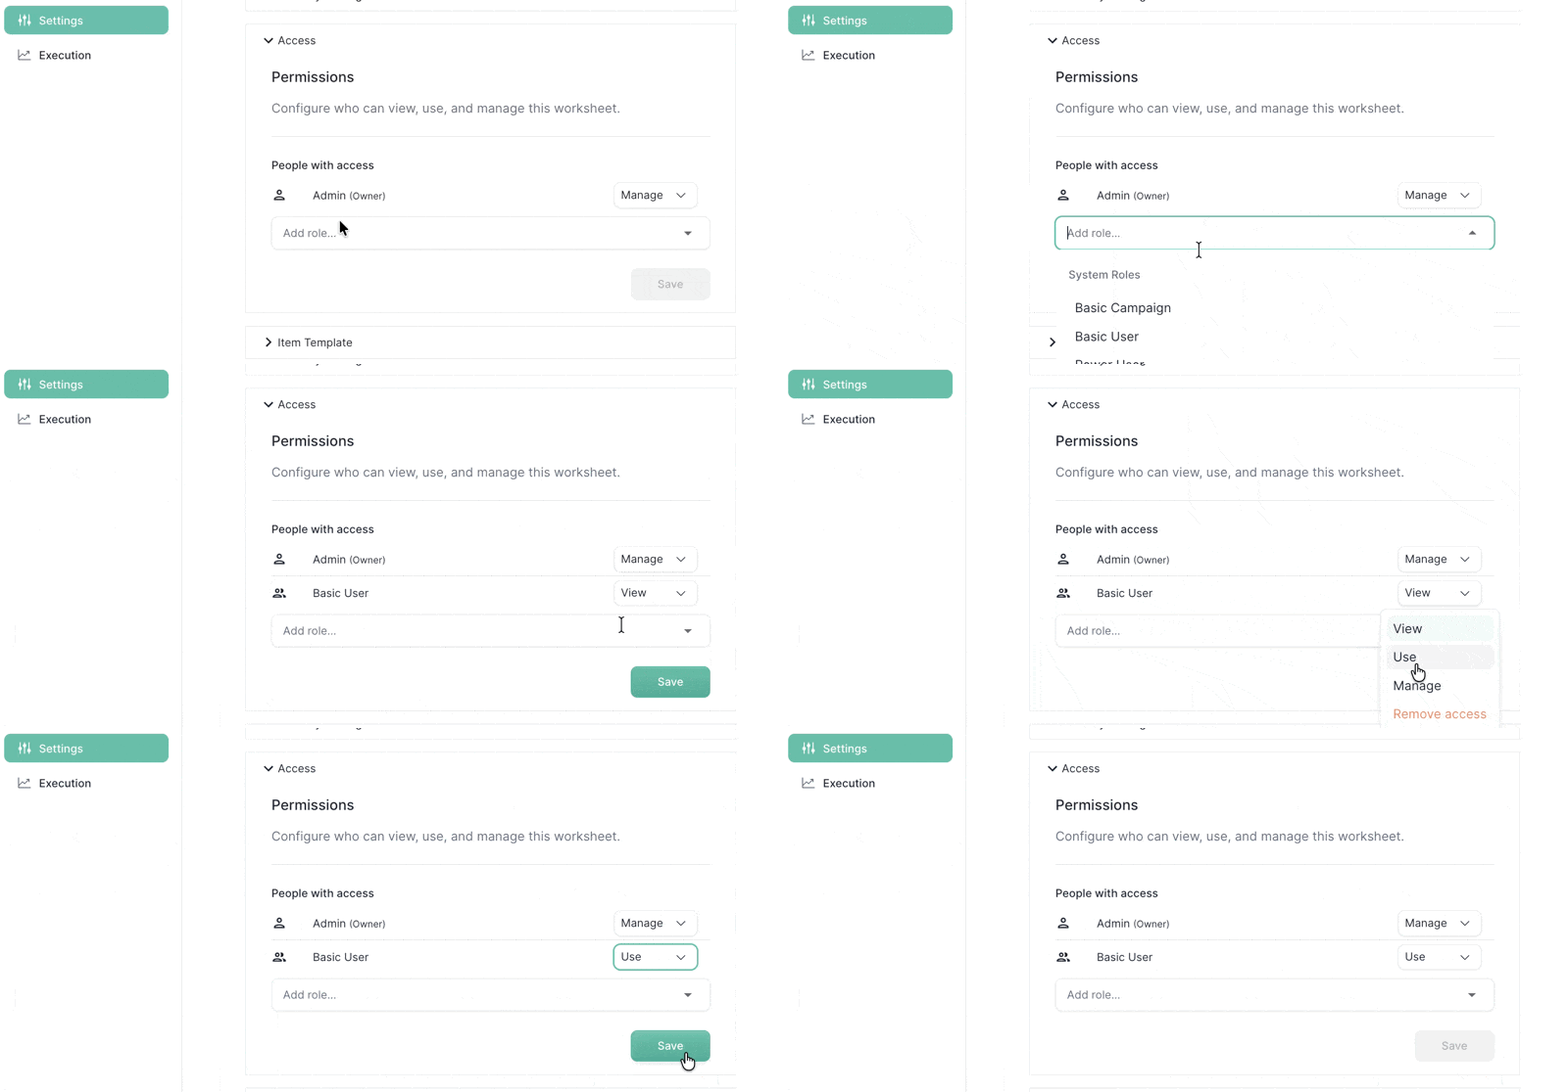
- Open the worksheet you want to configure
- Navigate to the worksheet’s Settings
- Update which roles have access to:
- View — See the worksheet and its contents
- Use — Run the worksheet with their own data
- Manage — Edit the worksheet configuration
Template Access Control
Templates have two layers of access control: Template visibilityIn the template worksheet’s settings, you can control which roles can see and use the template. Instance visibility
You can also control who has access to worksheets created from the template. For example, you can configure a template so that instances are only visible to the user who created them — ensuring each user only sees their own work.
Admins always have full access to all worksheets and templates, regardless of access control settings.
Available permissions for custom roles
Available permissions for custom roles
Custom roles are built by combining the following permissions:
Need Help?
Contact your system administrator or reach out to support@allgoodhq.com.Troubleshooting
Users can't sign in
Users can't sign in
- Social Sign-On: Ensure they’re using the correct Google/Microsoft account associated with your organization
- SAML/SSO: Verify with IT that the user is properly provisioned in your identity provider