Capabilities
Connecting Salesforce to the allGood platform enables deep integration with your CRM data. Key capabilities include:- Lead-to-Account Matching
Mary finds the right account for every lead. We use agentic search to resolve duplicate Account records, fix typos, expand or contract acronyms and initialisms, and incorporate custom contextual clues and signals (ICP match, BDR assignment, etc.) to ensure the best possible match. - Lead Routing
Mary understands your routing rules. We can handle MQL/AQL determination; understand your lead’s geography even when data is missing, incomplete, or inconsistent; and route leads to your sales team based on the results of account-level research agents. - Lead Conversion
Mary can figure out which of your Leads are worth converting to Contacts---tying in lead-to-account match information, agentic MQL/AQL/SQL determination, and other custom/contextual signals to make the best possible decision. Mary will also deduplicate Lead records by intelligently merging them into the same Contact when possible. - List/Campaign Upload
Mary can take lists of leads/contacts, perform data cleaning and normalization, and upload them to Salesforce as members of a Salesforce/Pardot campaign. Mary can handle campaign status setup, and once the campaign has been created, Mary can create SFDC reports to track campaign performance. - Data integration into other Mary use-cases
Connecting Salesforce data allows us to pull your CRM data into any other Mary use-case. We can query live data with SOQL, or run agentic search against a cloned snapshot of data in allGood’s internal, tenant-isolated Snowflake data warehouse.
Prerequisites
Before setting up the Salesforce integration with Mary, ensure you have:- Salesforce Account with Enterprise access or API quota purchased
- Admin access to your Salesforce instance to create users and profiles
- Access to email for the dedicated Salesforce user account verification
- allGood account with integration permissions
Step-by-Step Setup
1
Create allGood Profile in Salesforce
- Log in to Salesforce with an admin account
- Click the gear icon (top right) → Setup
- In left navigation: Administration → Users → Profiles
- Click New Profile
- Set Existing Profile to Read only
- Set Profile Name to allGood User
- Click Save
2
Configure Profile Permissions
- On the Profiles page, click Edit next to your new profile
- Scroll to Standard Object Permissions and Custom Object Permissions
-
Enable View All Data permissions for objects Mary should access. At the minumum, enable full read access for
User, and full read-write access forAccount,Lead,Contact,Opportunity, andCampaign.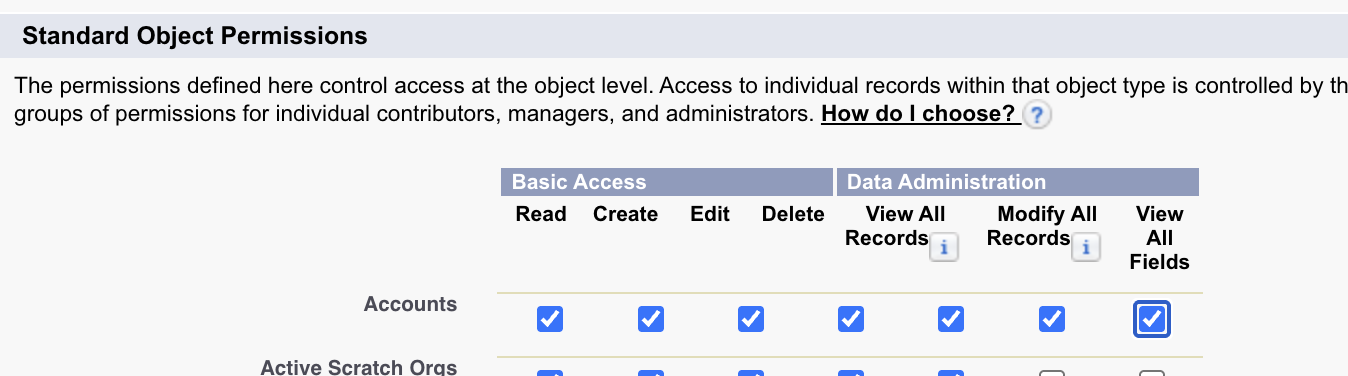
Enable SFDC permissions for each of the above object types.
- Scroll to top and click Save
3
Create Dedicated User Account
- In left navigation: Administration → Users → Users
- Click New User
- Fill required fields:
- License: Select Salesforce
- Profile: Select allGood User
- Email: Use accessible team email address that somehow indicates “allGood”
- Make sure the
Marketing Userbox is checked.
- Click Save
- Copy the Username and store it securely
4
Verify User Account
- Check the email inbox used for the new user
- Open the Salesforce verification email
- Follow the verification link and set a password
- Store the password securely.
5
Connect Integration in allGood
-
Log into allGood and navigate to Settings → Integrations. Click Install next to “Salesforce”.
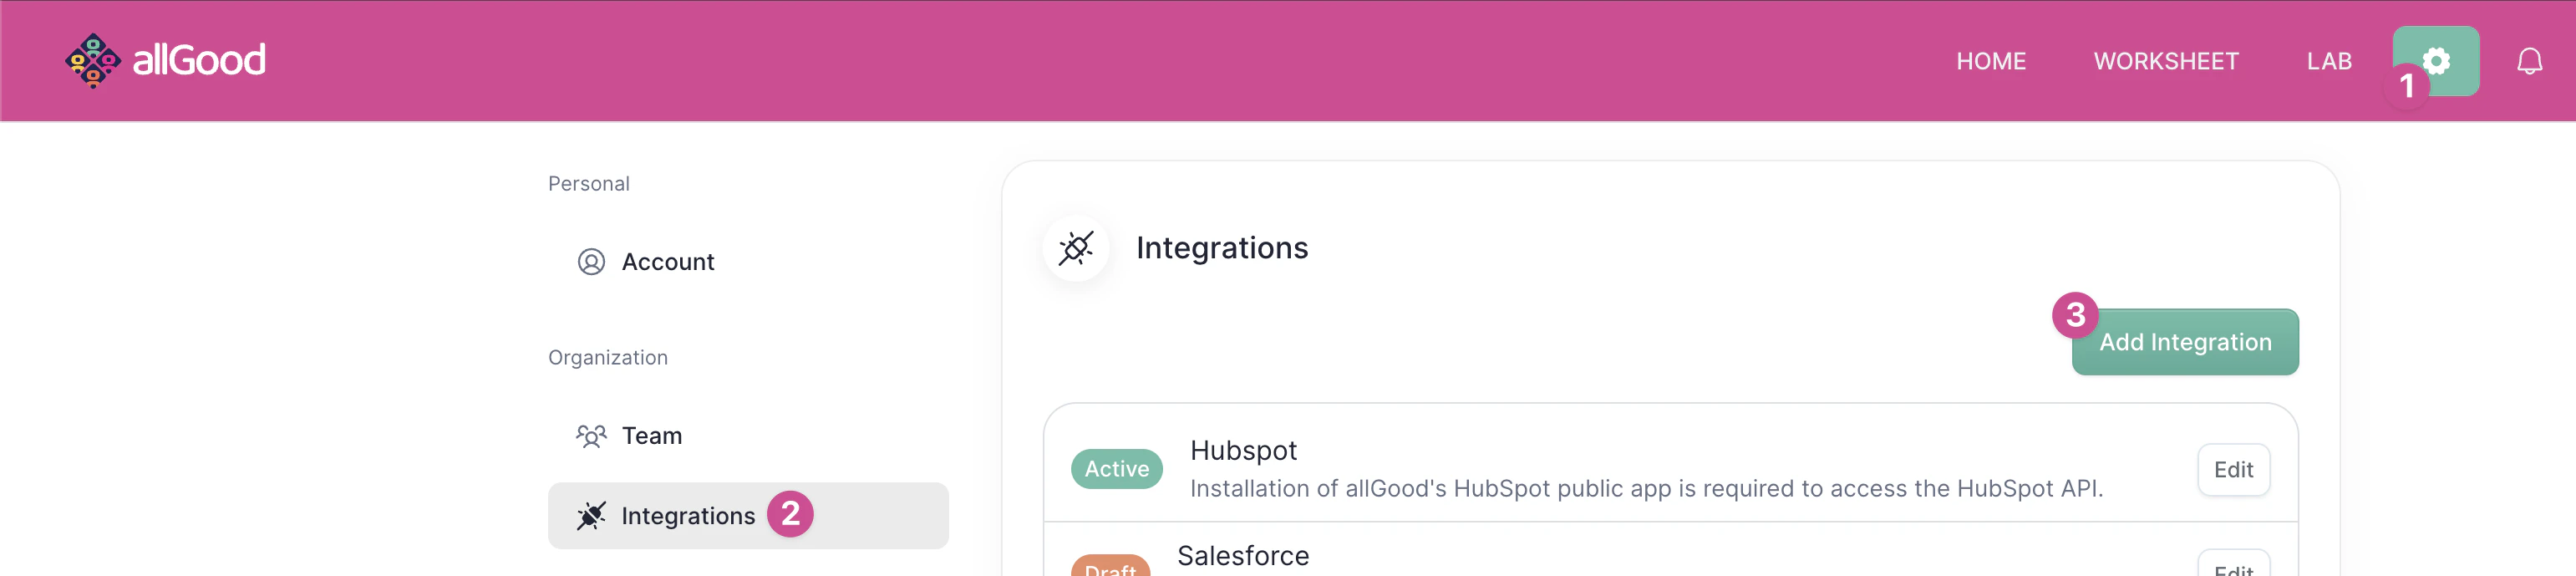
Click "Install" on the Salesforce integration.
-
Select the right SFDC environment (either production/live, sandbox, or a custom instance login URL)
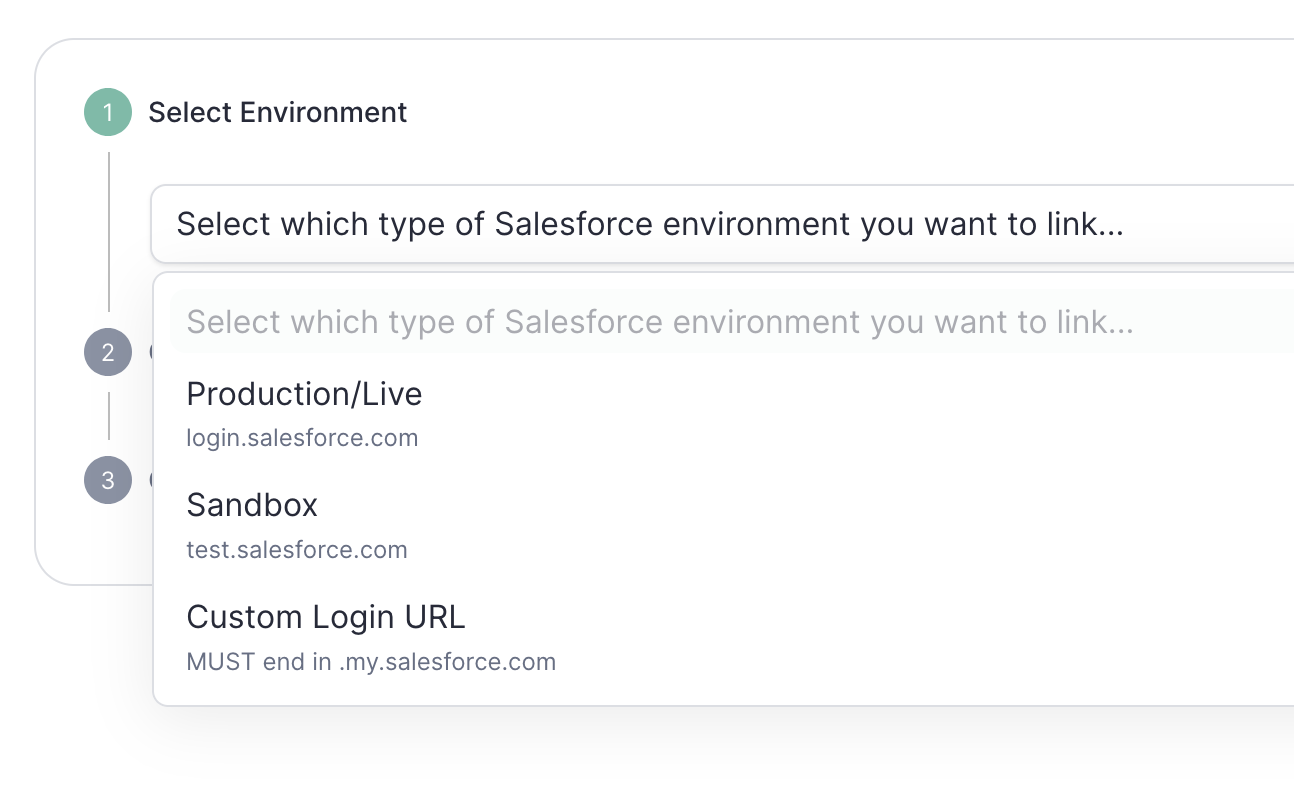
Select the right SFDC environment
-
Click Connect to Salesforce .

Connect to Salesforce
- Sign in using the allGood user credentials created above
- Verify the integration shows as Active on your integrations page
Verification & Testing
If Salesforce shows “Active” status in allGood integrations, Mary was able to connect successfully.Frequently Asked Questions
Which Salesforce edition do I need?
Which Salesforce edition do I need?
The integration works with Professional, Enterprise, and Unlimited editions.
Developer and Essentials editions have limited API access.
What permissions does the integration user need?
What permissions does the integration user need?
The integration user needs “View All Data” permissions for objects you want
to sync, plus API access permissions.
What Salesforce objects are supported?
What Salesforce objects are supported?
The integration supports standard objects like Leads, Contacts, Accounts,
Opportunities, and Cases, plus custom objects.
How does the integration handle custom fields?
How does the integration handle custom fields?
Custom fields are fully supported and can be mapped between Salesforce and
allGood according to your requirements.
Troubleshooting
Why am I getting login errors?
Why am I getting login errors?
Common causes include:
- Incorrect credentials
- IP restrictions
- Security token issues
- Expired passwords
How do I handle API limits?
How do I handle API limits?
Salesforce has daily API limits. The integration includes smart batching and scheduling to optimize API usage.
Where can I get help?
Where can I get help?
- Review this page for setup steps and common issues
- Contact our support team for technical assistance